The Windows 10 lock screen has received several updates in the most recent Windows 10 versions, including not only Windows Spotlight, which replaces the wallpaper with a new one on a daily basis, but also Cortana integration to be able to use the digital assistant without unlocking the PC.
But in terms of customization, the lock screen is rather limited, and one of the things that users can’t change is their name displayed every time they’re asked to input their password.
Basically, this means that their own name is shown on the lock screen with no option to disable it. For the majority of users, that’s not at all a problem, but for others, especially when using PCs in public, it could be an issue.
Fortunately, there’s a rather easy way to repair this, though I’d say that only advanced users should turn to it because it involves playing with the Registry Editor. It doesn’t take too much time to do it, but to make sure that nothing breaks down, you should create a backup, which technically allows you to return to your previous configuration with just a few clicks.
So let’s start. The first thing you need to do is launch the Registry Editor. Press the Win key + R and type regedit. Make sure you are logged in with an administrator account because otherwise you’re not allowed to make changes to the Windows Registry.
In the Registry Editor, navigate to the following path – you can do this either manually by clicking each folder, or simply copy and paste the path in the address bar:
HKEY_LOCAL_MACHINE\Software\Microsoft\Windows\CurrentVersion\Policies\System
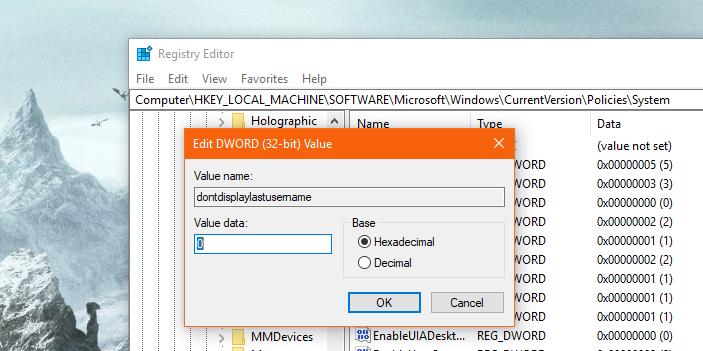
Here, you need to look for an entry called dontdisplaylastusername and double-click it. By default, it comes with value 0, so what you have to do is change this value to 1. Click OK, but don’t close the Registry Editor just yet because there are more changes that need to be made here.
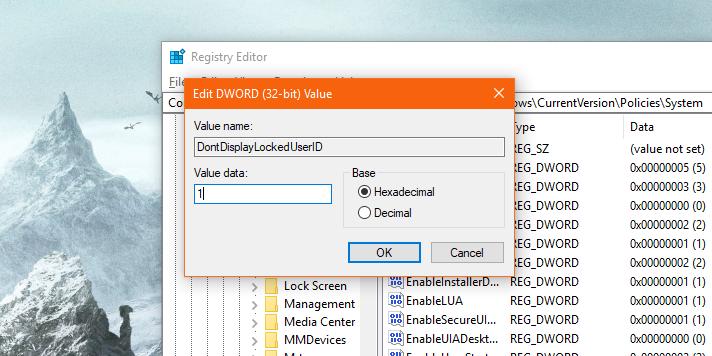
In the right side of the window, right-click and head over to New > DWORD (32-bit) Value that you’re going to call DontDisplayLockedUserID. Open this newly-created item and instead of value 1, which is configured by default, you need to enter value 3. Click OK and now you can safely close the Registry Editor. Reboot your system and the changes should be made to your lock screen, with the name no longer displayed.
If you want to return to the previous configuration, you can delete the newly-created registry key and input value 0 for the dontdisplaylastusername record at the path mentioned above.
BONUS: If you want, you can also provide a fake name in your account information and have it displayed on your lock screen. Of course, this isn’t quite the most convenient workaround since these details will also show up in other parts of the operating system, such as in the Start menu, but it’s one easy way to do it.
Also, you can switch to a local account, which you can call however you want. Again, this isn’t the most convenient resolution because you’re missing on a lot of features that require a Microsoft account, so the registry hack mentioned above might still be your only option.
It remains to be seen if Microsoft will add an easier way to hide your name on the lock screen in future Windows versions, but for the time being, it won’t be possible to do it in Windows 10 Redstone 4. This particular OS release is projected to land next month, but a new Windows 10 version is due in the fall, so depending on feedback, such options could make their way to the lock screen.

 14 DAY TRIAL //


