Windows 10 May 2020 Update, or version 2004, is finally here, and while it’s currently available only for those manually checking for updates on devices running version 1903 and 1909, many seek to alternative methods to install it on their devices.
Those using the standard method that’s recommended by Microsoft, and which comes down to checking for updates in Windows Update and then downloading the May 2020 Update if it’s available, should then end up having several gigabytes of data that are used by the previous Windows installation.
And this is exactly how things are supposed to be because of one good reason: all these files allow you to go back to the previous Windows version if something goes wrong after the update.
In other words, if there’s anything that’s broken in the May 2020 Update, you can just downgrade to whatever version you were running before the update. And to do this, the files stored in the previous Windows installation backup are used.
These files are stored in a folder called Windows.old and which you can find on the system drive (very often this is the C:\ drive).
What you need to know is that these files are automatically removed by Windows 10 after 10 days. This means that you are no longer able to downgrade to the previous Windows version after 10 days, as Microsoft thinks this is enough for everyone to determine if everything’s running OK or not.
So if you want to claim back your space, there are two options: you can either wait for the 10 days to pass and have Windows 10 to the whole thing for you or just delete the previous Windows installation yourselves without the need for waiting any longer.
There are several ways to do the whole thing on your own, but let’s stick with the methods that don’t require other apps (if you want to use a third-party app, CCleaner is also capable of removing previous Windows installations).
The first method comes down to the Storage Sense tool that comes bundled with Windows 10. So on Windows 10 May 2020 Update, head over to the following path:
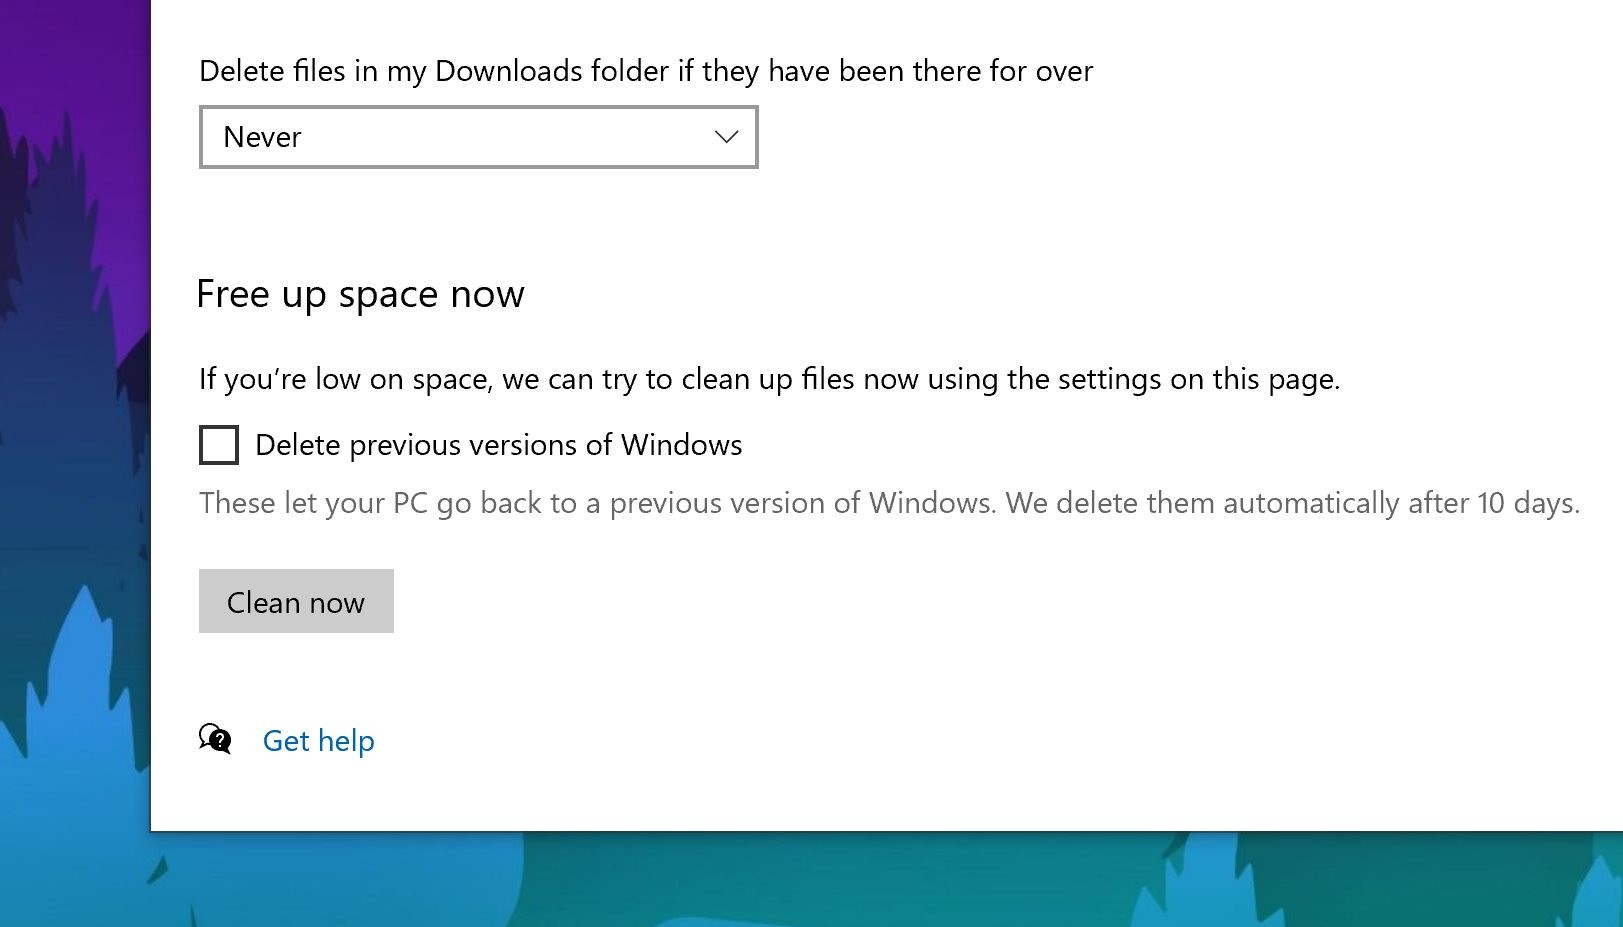
Windows 10 > Settings > System > Storage > Configure Storage Sense or run it now > Free up space now.
In this screen, make sure that you check the option that reads:
Delete previous versions of Windows
When you are ready, click the Clean now button and then let the Storage Sense app do its magic.
If you want to use the classic method, Disk Cleanup can take care of the whole thing too. Click the Start menu, type Disk Cleanup and then follow this path:
Disk Cleanup > Clean up system files > Previous Windows installations > OK
And because deleting the previous Windows installation files comes down to removing the Windows.old folder, you can also do this with a command in Command Prompt. So first of all, launch a Command Prompt instance with administrator rights (Start menu > cmd.exe > Right-click > Run as administrator), and then simply run the following command:
RD /S /Q %SystemDrive%\windows.old
In all cases, it’ll take a while for the cleaning to complete, so give it a few minutes before doing anything else on the device. A reboot of the device is not required, and you should see the amount of free space increasing as the progress advances.
Keep in mind that after removing the previous Windows installation you can no longer go back to the Windows 10 version that you were running prior to updating to the May 2002 Update.

 14 DAY TRIAL //

