14 DAY TRIAL //
 Remember when your HDD only had a total of 512 MB of space and you had to carefully select Windows 95 components in the installation process so there would still be a bit of free space for you to use? No? Oh, well…
Disk space is now less of a concern, but this doesn’t mean you don’t get to spend some time picking the things you want to be deployed with Windows, even if this means managing features after setup.
What’s more, you might not be there for every small decision the setup process forces you to make, which means it’s going to stay stuck in that phase until further notice. Wouldn’t it be nice to simply run setup, and come back after half an hour to find your computer ready to be used?
Well, it just so happens that programmers have already come up with solutions to this inconvenience. As such, we’re going to study a couple of them, and see how to create an unattended Windows 10 setup package.
Installing Windows at the press of a button
Microsoft too thought and developed a way through which to create an unattended Windows setup package, but the amount of effort and attention it requires for proper functioning is excruciating, and we’re going to skip the steps required to go through. In case you’re interested, you can find the required components (yes, it’s not just a program) here, along with related info.
| --> Windows Automated Installation Kit (AIK) |
| --> Windows Assessment and Deployment Kit (ADK) for Windows 8.1 |
| --> Microsoft Deployment Toolkit |
| NTLite |
|---|
Step 1: Download, install, and run NTLite.
Step 2: Press the Add button at the top left corner of the main window, and choose either Image Folder or Image File (WIM, ESD, SWM), depending on the package you have.
Step 3 (for Image Folder option): Navigate through the Source List until you identify the Operating System entry that suits your architecture, and press Load. You’re asked to confirm the file, so press OK when the prompt appears.
Important note: Any conversion happening in the application replaces original files, so be sure to create a backup.
Step 4 (optional): Browse through the categories on the left pane to configure Components, Features, Updates, Drivers, Tweaks, and Post-Setup.
Note: It can take some time to manage all areas specified above, as these also refer to general Windows behavior post-install.
Step 5: Head all the way to the Unattended section on the left navigation pane.
Step 6: Notice that options are grayed-out. This is because the Default configuration is applied, so you need to Enable editing from the upper left corner of the main window.
Step 7: Select each option and use the corresponding drop-down menu to set options. The menu is a bit difficult to see at first, but it’s actually the right part of the main window, with the drop-down menu button all the way close to the edge.
Step 8: Switch to Apply from the left pane, choose to Create ISO (optional) from the upper toolbar, and hit Start.
Step 9: Burn the new image to DVD or place it on a bootable USB flash drive, and you can now install Windows simply by triggering setup, given you configured all options properly.
| The easy way around |
|---|
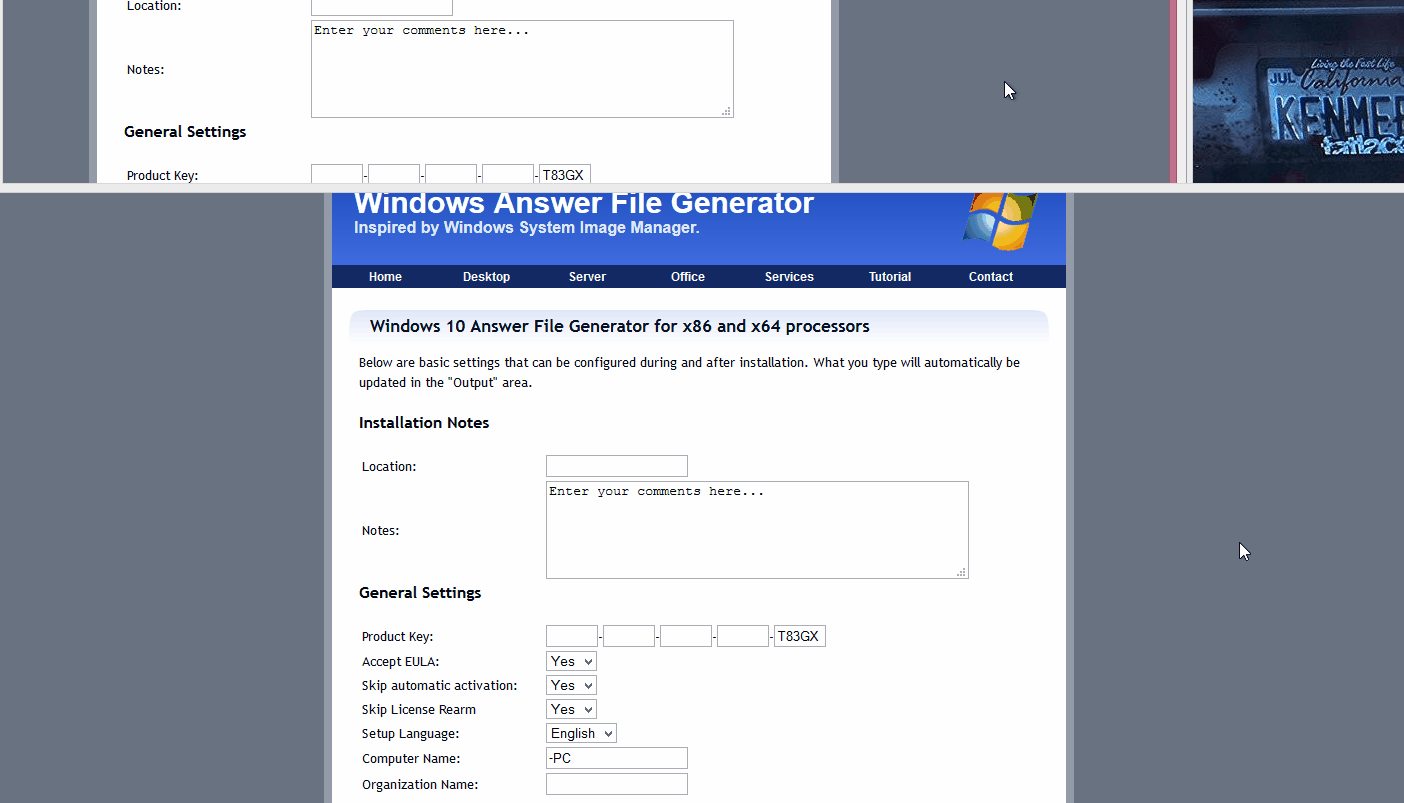
Step 1: Launch your browser (or open a new tab now), and go to this website.
Step 2: Hover your mouse over the Desktop tab (the one next to Home, and followed by Server, Office, and Services), and choose the Windows version you want.
Step 3: Carefully go through the list of options and set your preferences for Installation Notes, General Settings, Regional Settings, Out Of Box Experience, Partition Settings, and User Account.
Important note: Pay extra attention to the Partition Settings, because improper management can completely wipe the disk, thus resulting in data loss in case you wanted to save some files.
Step 4: Press the Download File link all the way at the bottom of the page. It’s just below the code field.
Step 5: Place the newly downloaded Autounattend.xml file in the root of the USB flash drive where Windows installation files are found, or setup CD/DVD.
Now you can go ahead and install Windows by paying a lot less attention, or even attend to some other activities while setup deploys the operating system with your preset configurations.
In conclusion
It’s recommended that the first time you go through with the setup process as it was intended. Once you’re familiar with options, it’s good to have an installation package fitted with your custom configurations, because you never know when you want or need to reinstall Windows.