Windows 10 has been optimized for longer battery life, and Microsoft has been focused particularly on making the operating system and the apps that come with it as power efficient as possible.
For instance, the company has praised Microsoft Edge’s low battery impact on several occasions, claiming that this is what sets the browser apart from the rest of the industry.
While we all know how everything ended up for Microsoft Edge, being a battery-friendly application is critical these days, especially as more and more users choose to work on the go without a nearby power source.
As expected, Windows 10 lets users keep an eye on the battery level, and provide notifications whenever they get close to the moment the device needs to be plugged in.
Like its predecessors, Windows 10 comes with several policies that make it possible to configure battery notifications, and even set up the operating system to automatically sleep, hibernate, or even shut down the device when reaching a lower battery level.
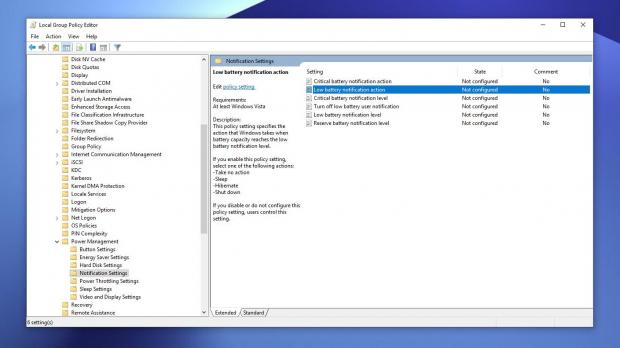
First and foremost, on Windows 10 Pro you need to launch the Group Policy Editor by typing gpedit.msc in the Start menu or when pressing Windows key + R. Then, navigate to the following path:
Computer Configuration > Administrative Templates > System > Power Management > Notification Settings
As you can see in the right side of the screen, there are several policies that let you configure notifications and the actions that are performed on certain triggers. The available policies in Windows 10 19H1 are the following:
Critical battery notification action
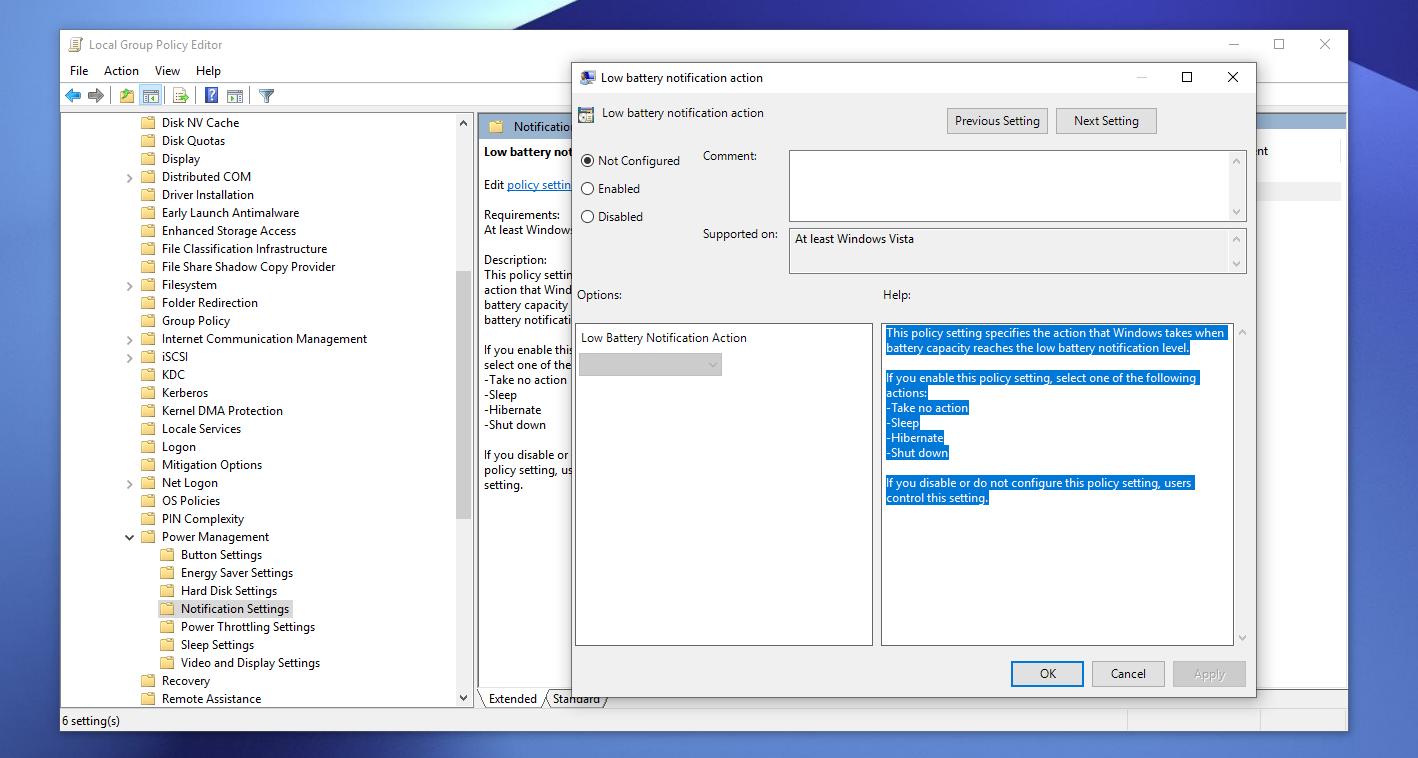
Low battery notification action
Critical battery notification level
Turn off low battery user notification
Low battery notification level
Reserve battery notification level
Double-click this policy to enable it – by default, the policy is not configured, so you need to turn it on and then set the action that you want to perform when the low battery level is reached.
In the options box in the lower part of the screen, you need to configure the action that would be launched when the low battery level is reached. You can choose between sleep, hibernate, shut down, and no action. Choose the one you want, hit OK and that’s pretty much all you need to do here.
One extra parameter that you need to configure is the low battery notification level, which basically lets you configure when to run the action that you set up earlier.
This can be done with the policy using exactly this name and available in the same location. So double-click the policy called Low battery notification level and then enable it. In the lower part of the screen, configure the low battery notification level using a numeric value that represents the percentage when the notification is triggered.
For example, you can set the level to 20, so when your battery percentage drops to 20%, you’ll see a notification warning that you’re running out of battery and you need to plug in the device.
No reboot is required to save the changes, and they are applied immediately. However, if you’re already on low battery, you may need to get a full charge before the configured action is triggered on your device.
These policies are available on all Windows 10 versions, and continue to be offered on Windows 10 version 1903 launching in April 2019.

 14 DAY TRIAL //

