14 DAY TRIAL //
 The process of installing Windows 7 involves a stage in which end users need to Set a Network Location. The SNL dialog window can be revisited after deployment, and the settings altered. In this context, location is key. In order to simplify the network configuration, Windows 7, just as Windows Vista before it, allows users to set up a network connection in accordance to location. The SNL dialog offers three different network locations: Public, Work and Home. What it does is that when the computer detects a network connection, options are provided for the user to help define and apply appropriate network settings automatically.
User interaction is only necessary when choosing among Home, Work or Public locations, as Windows 7 does all the heavy lifting. But you can't even tell there's any heavy lifting involved as the configuration process is extremely fast, and I for example, have yet to see it fail even once, after countless installs of the platform in pre-Beta, Beta, RC and pre-RTM stages.
In all fairness, the Windows 7 client comes with an additional option for network location, namely Domain. However, Domain is reserved for enterprise environments and is out of the reach of end users. The option is controlled entirely by a network administrator, users cannot opt to take advantage of Domain by themselves or alter the configuration.
“The first time that you connect to a network, you must choose a network location. This automatically sets the appropriate firewall and security settings for the type of network that you connect to. If you connect to networks in different locations (for example, a network at your home, at a local coffee shop, or at work), choosing a network location can help ensure that your computer is always set to an appropriate security level,” Microsoft informs.
Network locations
It is important to understand that the location options are in direct correlation with network categories in Windows 7. The next iteration of the Windows client is associated with the following network categories: Public; Private and Domain-authenticated. Work and Home are Private, Domain networks belong to the Domain Authenticated category, and Public networks are intimately connected with the homonymous category.
“The Private category is split into Work and Home locations for internal Windows configuration. Some Windows 7 features behave differently depending on the Work or Home location. For example, HomeGroup - can only create or join while on a Home network; can only access other homegroup members if on a Home network. Remote Media Streaming (RMS): cannot act as content sources (RMS server) a server while on a Public network; can only act as content receivers (RMS client),” Microsoft stated.
In my experience, the difference between Public and Private networks, especially with Windows Vista, managed to confuse some users. I had to deal with people looking to share both folders and devices on their machine with other computers on the network. In attempting to do so, they set their PC to a Public connection, as they thought that Private would have the opposite result and close down access to their computer altogether. Indeed, the two options functioned vice-versa. So, if you want to share as much as your Windows machine as possible with other computers, Home and Private connections are the way to go. Want as much security as possible and no intrusions from the network? Then go with the Public option.
“Network Location and Windows Firewall are independent of each other, but the configuration of Windows Firewall is based on the current network category or categories (Windows Firewall supports multiple active firewall profiles). By default, if connected to a Public network, only Core Networking rules are enabled. By default, if connected to a Private network, Core Networking, Network Discovery, and Remote Assistance rules are enabled. Windows Firewall has no effect on the SNL dialog. The SNL dialog will display whether Windows Firewall is enabled or disabled,” the Redmond-based company revealed.
The labels used for the network locations are pretty much self-explanatory. The Home option doesn't necessarily need to be used for a home network, but rather when users can trust the computers and devices the machine will connect to. This is also the only option that will allow for the Windows 7 computer to create a HomeGroup, a feature designed to allow users to seamlessly share and access content among computers running the successor of Windows Vista.
A Work network is by definition a tad more limited than a home network. In this regard, although network discovery is enabled by default and computers and devices are visible among all users, a HomeGroup cannot be created.
“Choose Public network for networks in public places (such as coffee shops or airports). This location is designed to keep your computer from being visible to other computers around you and to help protect your computer from any malicious software from the Internet. HomeGroup is not available on public networks, and network discovery is turned off. You should also choose this option if you're connected directly to the Internet without using a router, or if you have a mobile broadband connection,” Microsoft stated.
Users will also notice that, at the very bottom of the SNL dialog, they have the option to “treat all future networks that I connect to as public, and don't as me again.” If this option is selected, network location will default to Public.
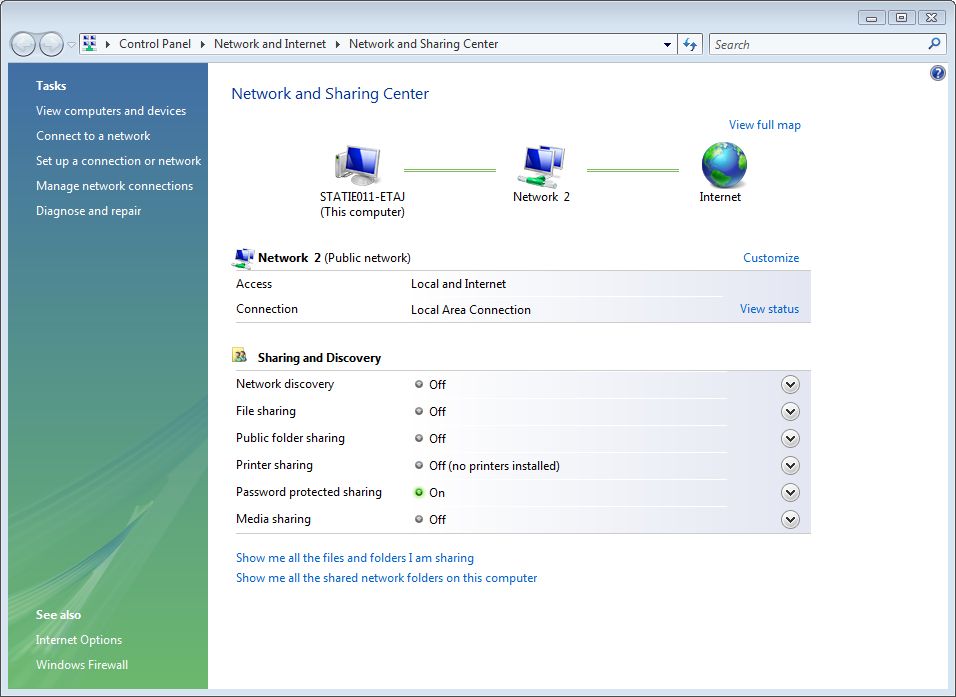
The Network and Sharing Center
The Network and Sharing Center has undoubtedly evolved in comparison to the feature introduced in Windows Vista. While in Windows XP's successor the focus was on Sharing and discovery settings, in Windows 7, the Network and Sharing Center brings to the foreground options related to setting up and connecting to a network, defining a HomeGroup and troubleshooting eventual problems.
By default, users will need to do nothing more than select a network location and Windows 7 will take care of the rest. “Client computers running Windows7, Windows Vista, and Windows XP are configured by default as DHCP clients, which obtain IP addresses and DHCP options automatically from the DHCP server,” Microsoft explained.
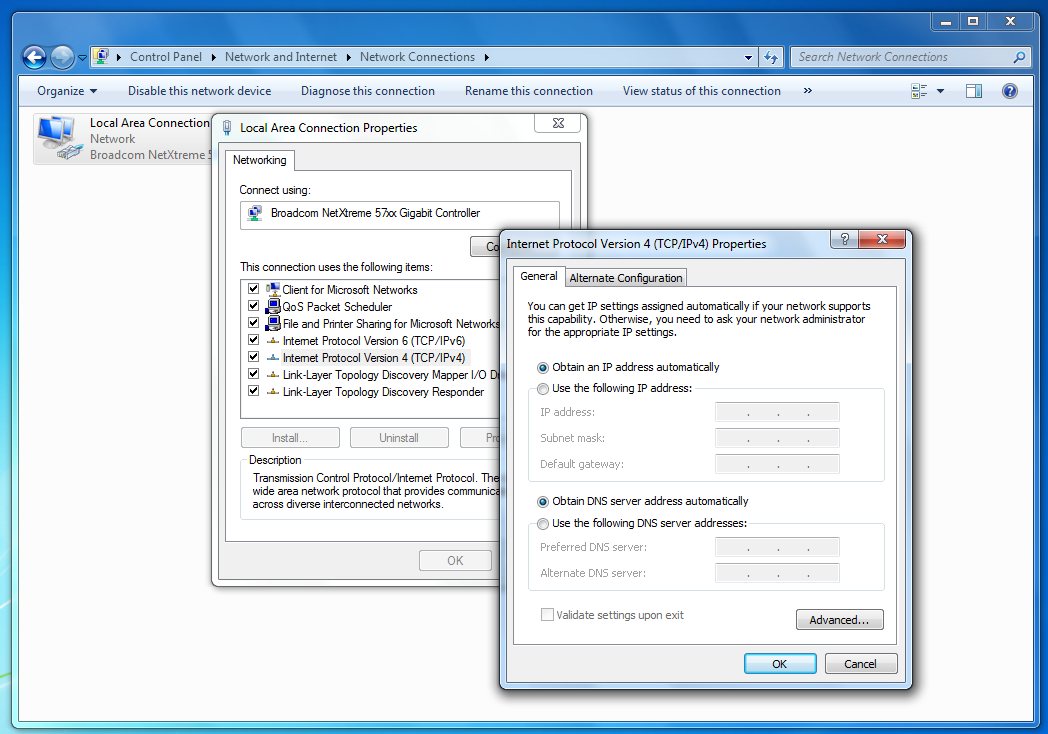
There is, however, one configuration aspect that I'd like to touch. As do its precursors, Windows 7 allows end users to configure a static IP address. The procedure is rather simple. Here is what users need to do. Click Start, and then navigate to Control Panel, Network and Internet, Network and Sharing Center. Network, and Change adapter settings in the left had side pane. Right click the Network Connection you want to change and select Properties. In Local Area Connection Properties, click Internet Protocol Version 4 (TCP/IPv4), and then Properties. In Internet Protocol Version 4 (TCP/IPv4) Properties, the General tab will permit you to enter a specific IP address, Subnet mask and Default gateway. You will also have to specify the IP address of the DNS server (or you can use the IP address of the local computer if it is the machine in use as a DNS server.
Domain join for Windows 7
I have also mentioned that Windows 7 has a fourth location option: Domain. “Connecting to a domain network automatically sets the network category to domain authenticated. Some Windows 7 features behave differently depending on the domain-joined status of the computer. For example, HomeGroup: domain-joined computers cannot create a homegroup; can only join a homegroup; cannot share files or printers with a homegroup (cannot push content); can access other homegroup members’ files and printers (can pull content). Remote Media Streaming (RMS): domain-joined computers cannot act as content sources (RMS server); can only act as content receivers (RMS client),” Microsoft revealed.
As I've said before, the Domain location for Windows 7 clients is the responsibility of a network admin. To join a specific domain, users will need appropriate credentials, namely an account and a password. These can only be created by the network administrator and supplied to end users. Still, users can join a Domain with their Windows 7 machine.
Right-click on Computer and select Properties. Under the Computer name, domain, and workgroup settings section, go for Change settings, and again for Change under Computer Name tab, the last option at the bottom. Next, enter the Computer Name, the Domain name supplied by the network admin. In the Windows Security dialog > Computer Name/Domain Changes, enter the User name, and the Password. All you need to do now is restart the computer as indicated for the new settings to come into effect.