14 DAY TRIAL //
 Firestarter is a free graphical tool which enables you to easily set-up a firewall using iptables. Its clean and intuitive interface allows you to secure your system within minutes. Moreover, Firestarter supports NAT for sharing the Internet connection among multiple computers, port forwarding for redirecting traffic to an internal workstation's port, real-time event monitor that shows intrusion attempts as they happen, support for tuning ICMP and ToS parameters to stop DoS attacks and improve services for connected client computers and a few other features that enable you to set a custom and powerful firewall.
Firestarter can be found in the repository of most modern Linux distributions. To install it, simply use your distribution's package manager and you'll have it installed it in no time. Moreover, you can subscribe to a software repository in order to have Firestarter upgraded as part of your regular system updates. Repositories that include Firestarter: Fedora Extras, Gentoo portage, Debian/Ubuntu and Apt for SuSE.There's also a source tarball available for those that would rather compile the software themselves.
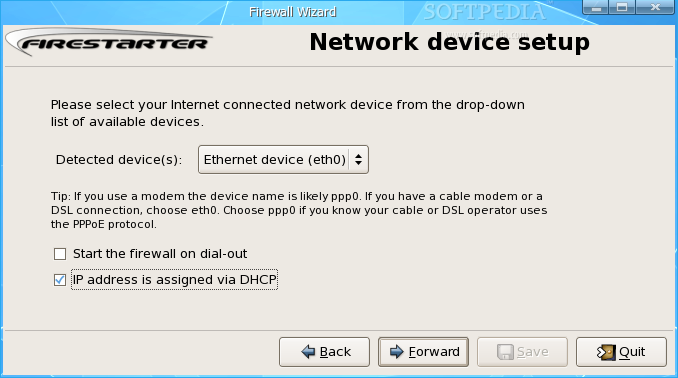
After installation, you'll find Firestarter under the System / Administration menu in Gnome or under System, in KDE KMenu. The first time you start it, it will run the Firewall Wizard which will ask you a few questions regarding network setup: after the welcome screen, you'll be asked to select your Internet interface and whether you want it to be started on dial-out and whether your IP address is requested from a DHCP server.
The next screen will ask you whether you want to share your Internet connection among the rest of the network computers, as well as if you want to enable DHCP service for those computers. Finally, the last screen announces that the wizard has finished and that your firewall is ready to start once you click the save button.
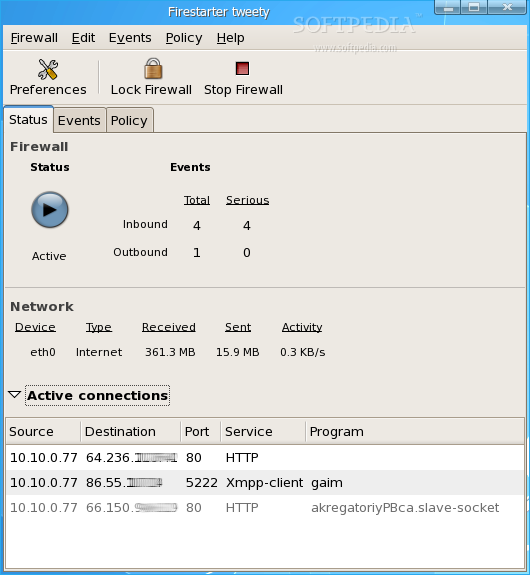
You'll now see the program's main window, which is divided in three tabs. The first tab, Status, indicates whether the firewall is active, a basic statistic regarding the inbound and outbound events (connections blocked). Also in this tab, Firestarter will show your active network devices and a list with the currently active connections.
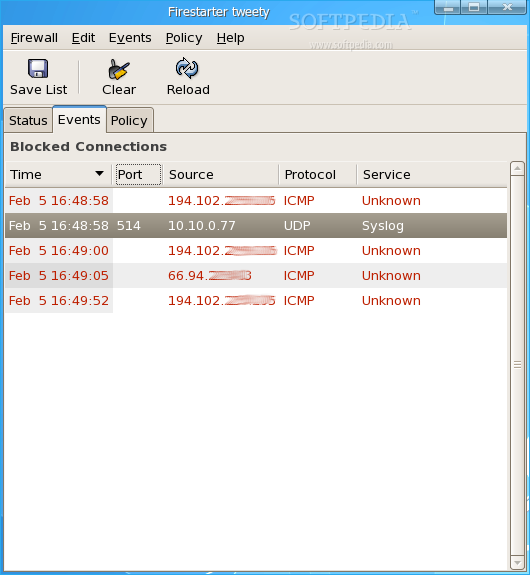
The next tab, Events, will list the connections currently blocked by the firewall. The events in red are unauthorized connection attempts, while the black ones are connections to a random port blocked by the firewall. You might also see some gray ones that are generally broadcast traffic. Each entry in the event tab has a context menu associated with it, accessed by the right mouse button. These actions change how the firewall will treat a similar connection the next time it sees it. Depending on the type of event you are invoking the context menu on, you are presented with different actions. For inbound entries, you can allow connections from source, allow everyone to access the service the connection was previously blocked from and allow only the source to access the service in question. The actions for outbound entries are: allow everyone to access the selected destination, allow everyone to make outgoing connections to the service in question or allow specific outbound access to the service.
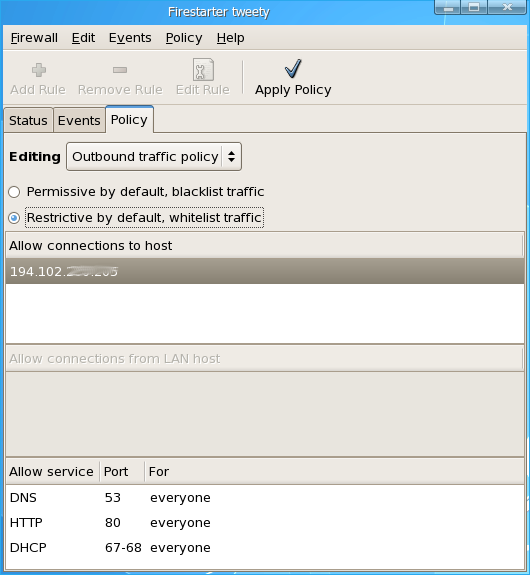
The policy tab is divided into two parts, the inbound and the outbound traffic policy. Each part consists in three lists, called rule groups. To add a new rule, select the group you want to add it to by clicking the corresponding list. Next, either click the Add Rule button from the toolbar or right-click the list. In this tab you can also edit any eventual rules added through the Events tab. To apply the changes, press the Apply Policy button on the toolbar. The outbound traffic policy has two modes, permissive and restrictive mode. The permissive mode will not restrict any outgoing traffic unless you specify to deny access to certain hosts or services. The restrictive mode will block all outgoing traffic and you'll need to explicitly create rules for every outgoing service you want to be accessible. This mode offers maximum protection but also a very intrusive one, as none of your network applications will work unless you create rules for them. Also, in this mode you'll see some rules that are already set to allow basic web browsing.
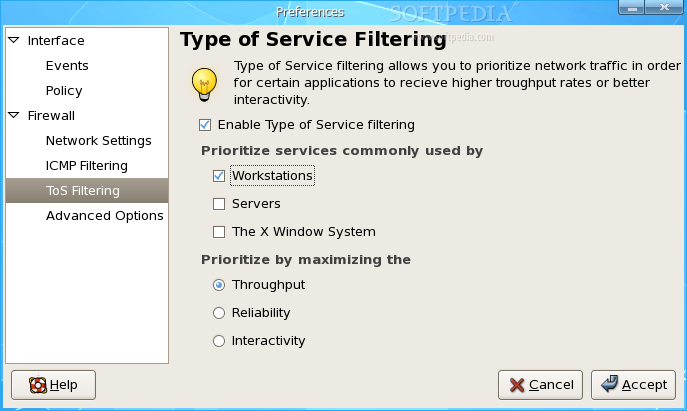
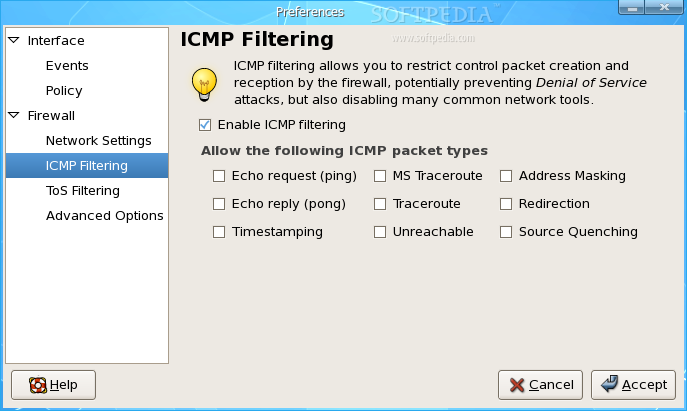
From the Preferences window, you can set various advanced options that control the behavior of the interface and the firewall. Here you can set various advanced networking options, such as whether to filter ICMP packets or enable ToS filtering. Also in the Preferences window, you can set the preferred packet rejection method which configures how the packets are being dropped.