14 DAY TRIAL //
 Every time a new graphics card comes out, especially one based on a new architecture such as Nvidia's GTX 580, early adopters and overclockers alike have to get over all sort of problems if they want to squeeze the maximum performance possible out of their brand spanking new GPU, so we are going t make this whole process a lot easier for all those of you GTX 580 owners out there that find themselves stuck in such a situation.
All the info that is shared in this article comes from Softpedia's own experiments with the GTX 580, Nvidia's graphics card making its way into our test labs just a few days ago.
For now we are going to limit ourselves to this overclocking tutorial as more info about the GTX 580 architecture as well as its performances will be covered in our review, that is bound to hit real soon.
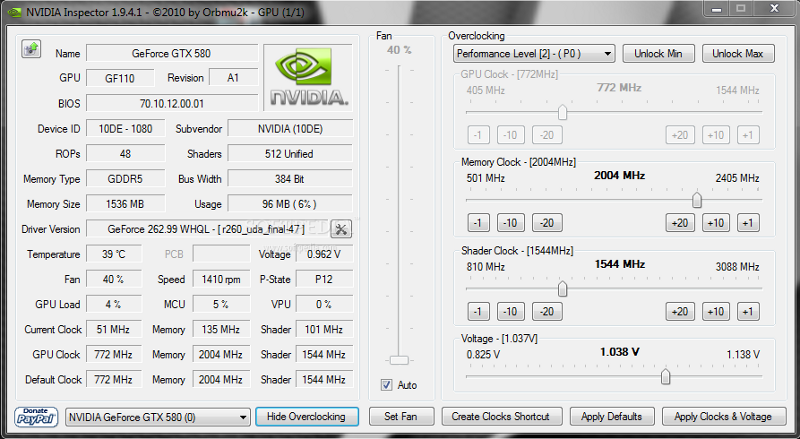
But getting back to the matter at hand, the first thing that I am going to do is to take a quick look at the card's default clocks to see where we stand.
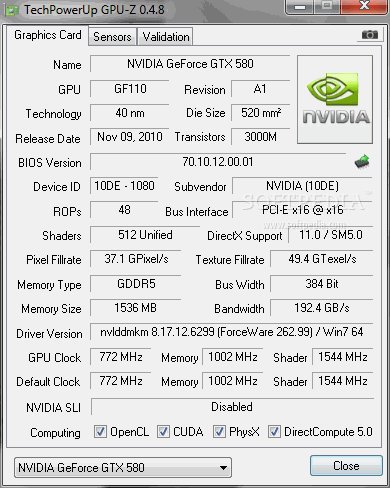
As you can certainly see for yourself the GTX 580's default core clock is set at 772MHz, its memory being clocked at 1002MHz (4008MHz data rate) while the shader clock runs at 1544MHz, being set at double the core's frequency, as its the case with all Fermi based video cards.
As in the GF100, this can't be altered by itself, so overclocking these cards is a matter of changing only two frequencies as well as the core's voltage.
And here is where we came into our first hurdle with overclocking the GTX 580, as voltage tuning utilities that support Nvidia's new GF110 core are really scarce at this time.
As a hardware reviewer, one runs into this sort of situations all the time, limited software support being one of the main reasons why overclocking results are not covered by every single review out there, especially when we are talking about new architectures that usually come with pre-production drivers and the like.
This is what happened to us when we reviewed the GTX 580 as well, and this is where the idea about writing such an GTX 580 overclocking guide came from, as most review sites out there don't mention what tools they used in order to overclock, leaving early adopters to search for themselves the right tool for the job.
With this in mind, we set up to bring our users a quick guide that will enable them to unlock the full potential of the GTX 580, Nvidia's card coming with an impressive overclocking headroom for an flagship product as you will most certainly see for yourself.
Pre-requisites
Before we start, the first thing to do is to download a few free tools from the Web, our main goal being to find a way of changing the core's voltage without resorting to hardware modes and other stuff like that, the GF110 coming with a CHiL 8266 digital PWM controller which decides just how much juice the core needs.
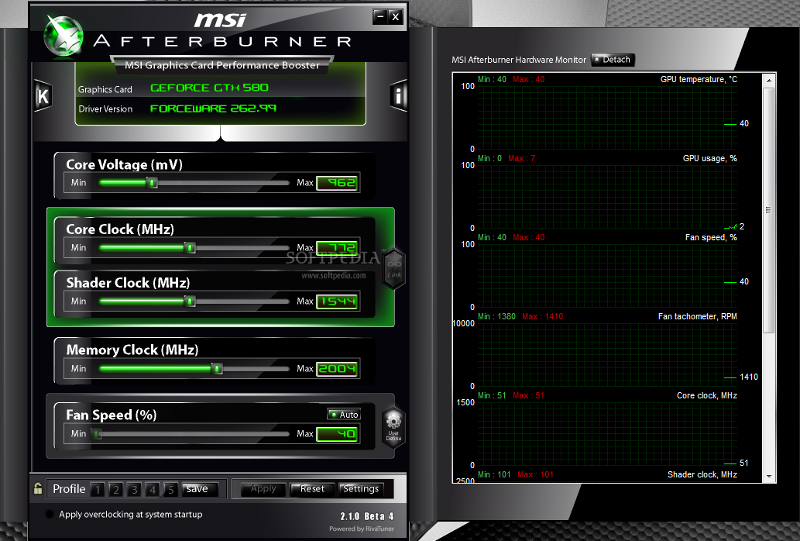
As its the case with many other PWM controllers used in today's top end graphics cards this can be also controlled via software, MSI Afterburner certainly being one of the most wide known tools available to overclockers worldwide.
Unfortunately, heading over to MSI's Afterburner website and downloading these tools gets us the 2.0 version, this coming without voltage control support for the GTX 580 as I soon found out for myself when trying to overclock the card for the upcoming review.
There's no need to worry though, beta versions of this tool are also available and usually come with support for the latest graphics cards out there.
Right now, the latest beta version is Afterburner 2.1 Beta 4, GTX 580 support making its way in the change log.
Another utility that supports the GTX 580 is Nvidia Inspector tool, this utility looking a lot like GPU-Z although it also comes with a really thorough overclocking panel, this being available for download from our website.
I recommend installing both of these tools and see what works best for you, Nvidia Inspector being also a really good alternative to GPU-Z, so you are really hitting two rabbits with one stone by going with this software.
The last tool that you need in your arsenal before getting to see what your GTX 580 is made off is the FurMark stress testing utility, available for download here.
Now that we got a hold of everything we need in order to overclock the GTX 580, its time for a small disclaimer as you need to understand Softpedia can't be held reliable for what happens to your video card is anything goes wrong.
Furthermore, we do not encourage overclocking if you don't know what you are doing, so please make sure you understand all the risks involved before getting started.
Another thing that I need to mention is this guide should also work for overclocking other Nvidia video cards, such as the GTX 480 and other Fermi based cards.
The overclocking process
I'll assume that, by now, you have downloaded and installed all the utilities mentioned in the pre-requisite section, so we are going to get right into the action.
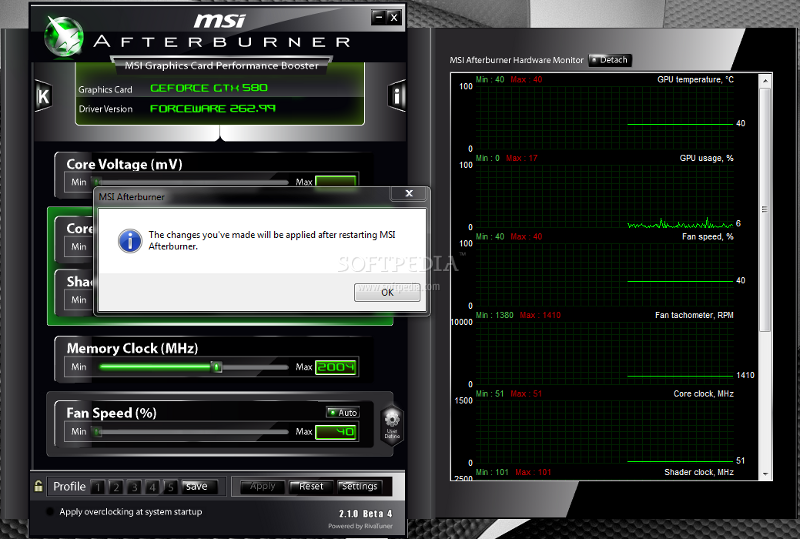
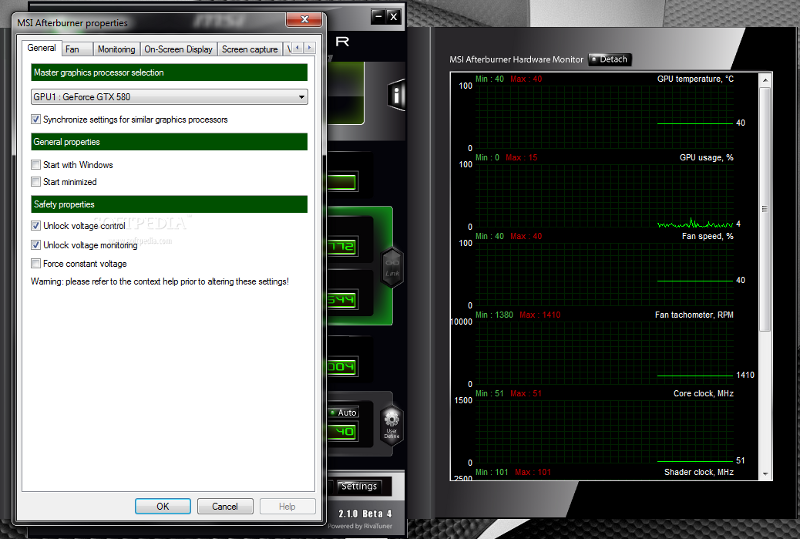
First thing to do now is to unlock voltage control and monitoring in MSI's Afterburner tool by heading to the Settings tab found in the bottom right corner of the program's main panel, the two check boxes needed being right under the General tab, in the Safety properties subsection, called Unlock Voltage Control and Unlock Voltage Monitoring, as you can see in the enclosed picture.
After clicking the OK button, you will get a message informing you these changes will be applied after restarting MSI's utility, so do as informed.
After restarting the utility, check the Core Voltage slider found at the top of the main Afterburner panel, to see if this worked.
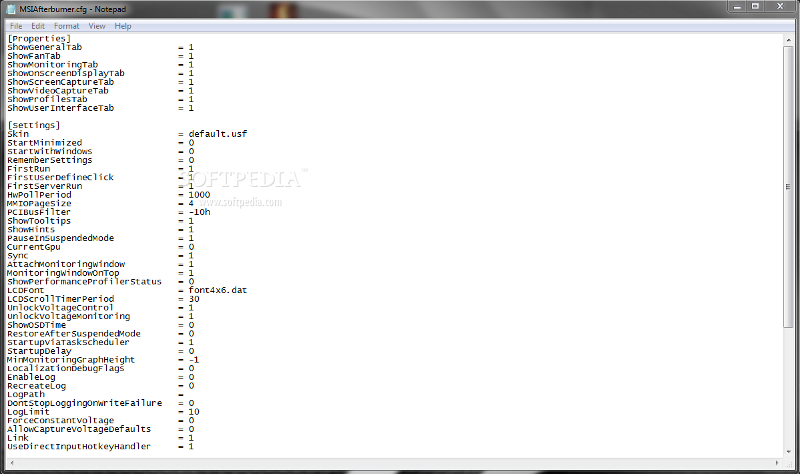
If it didn't, there is another thing you can try as Afterburner saves all its settings in an config file that is found in the installation directory, called MSIAfterburner.cfg, the values that we are interested in being found in the [Settings] section, as UnlockVoltageControl and UnlockVoltageMonitoring.
Change both of these values to 1 and you are all set to go.
After saving the settings and starting Afterburner the Voltage Control slider should be unlocked.
If this is still not the case, you can resort to the Nvidia Inspector tool, this also allowing core voltage to be changed, although the GPU frequency slider was not available to me (if this were to be enabled you can pretty much give up on using Afterburner as this can do exactly the same things as MSI's tool).
If this still doesn't work or if, for whatever reason, you don't want to change the GPU's voltage, the GTX 580 can also be overclocked without a voltage increase, but you mileage may vary since the core's frequency will most certainly be limited by the 1.035V supplied to the GF110 core.
If you don't seem to find the overclocking panel in Nvidia Inspector that is because there is a Show Overclocking/Hide Overclocking button that needs to be pressed in order to gain access to them.
For whatever reason, during my experiments, Nvidia Inspector and MSI Afterburner had different maximum voltages available, MSI's tool featuring a whooping 1.3V, although every report out there, as well as Nvidia Inspector, said 1.138V is the maximum core voltage available through software for thr GTX 580.
A few more experiments showed this is indeed the case as raising the voltage over 1.138V in Afterburner had no result on the overclock achieved, Nvidia Inspector also reporting the voltage is set to 1.138V, so it's safe to assume this is a bug that report the maximum available voltage wrong.
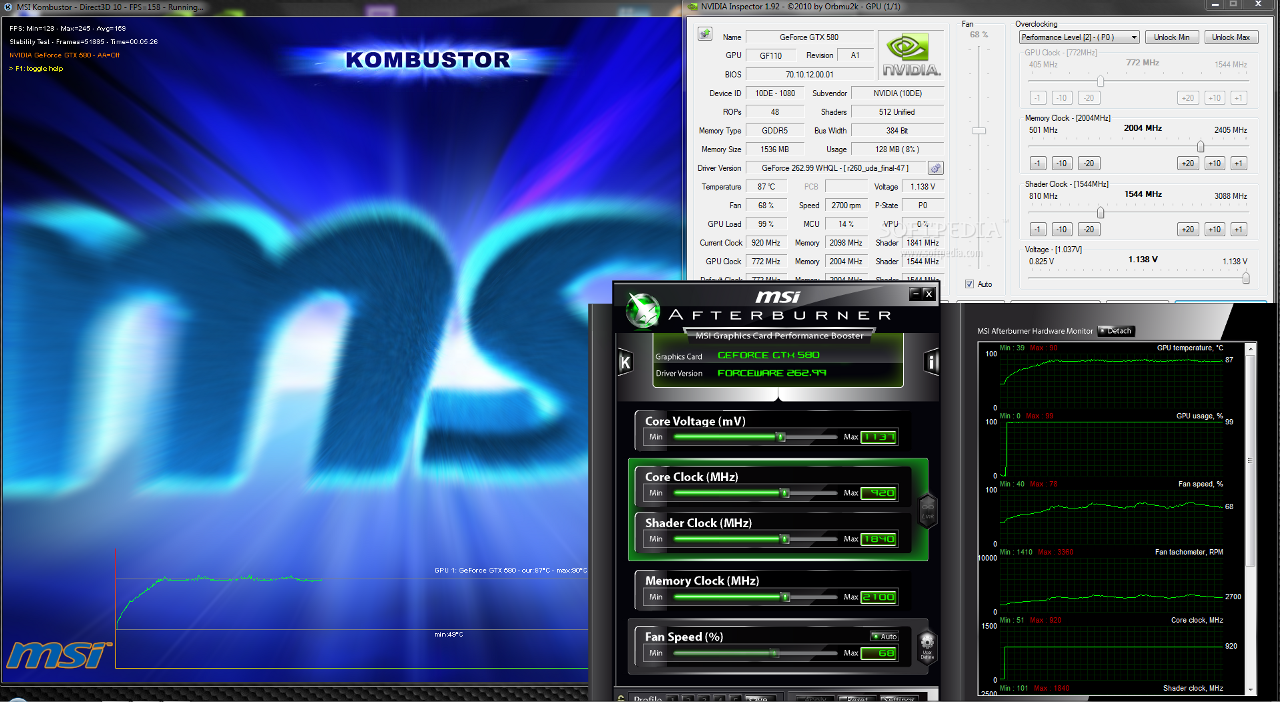
But moving past all that, with two overclocking tools at our disposal it's time to crank the voltage all the way up to 1.138V and see where this takes us in terms of performance.
To find the maximum overclocking values for the graphics card, start by gradually increasing the core's frequency (I recommend 25MHz increments if you are an overclocking noob).
After each increase fire up the FurMark stress testing program (I used MSI's Kombustor utility but it's basically the same thing as Kombustor is a redesigned FurMark), by just pressing the big GO! Button, the default settings being OK for testing the card's stability.
I recommend doing this for about half an hour and if everything works well raise the core frequency once again.
You need to repeat these steps until you get artefacts in the rendered image, until Nvidia's driver crashes or the computer freezes.
When this happens, don't worry, as this simply means that you have gone too far and you need to take a slight step back.
Restart you computer and fire Nvidia Inspector and MSI Afterburner again, following the same steps as before, but when it comes to setting the core frequency go 10MHz lower than your last attempt and start FurMark yet again to see how things work out know.
If everything goes well for half an hour this means that you have come pretty close to your GTX 580 maximum core frequency (you can further fine tune it if you want), but if it doesn't decrease the frequency yet again until you find the right value for you.
Now that you found the maximum frequency for your GPU is time to see what the memory chips hold in store, so repeat the whole process yet again, although this time increase your memory frequency instead of the core's clock.
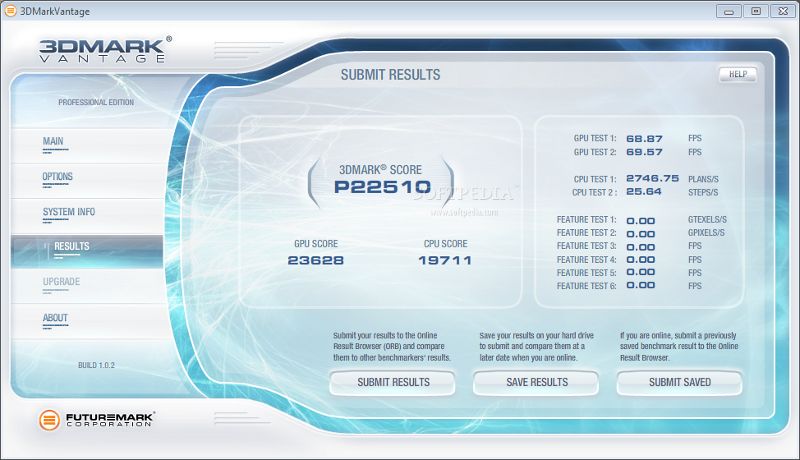
In my experiments, I managed to hit an impressive 920MHz for the core and 2100MHz for the memory, although I had to give up on raising the memory frequency further because of the limited time that I had at my disposal for this article, but if you have the time, I am sure these can go a lot higher, although is up to you to find just how high they can actually go.
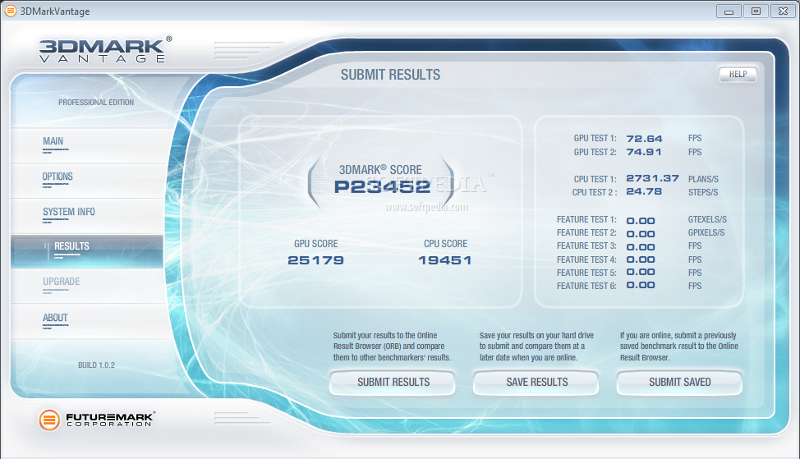
End of it all, this speed increase got me a 10.4% increase in the overall 3DMark Vantage Performance score, a pretty nice boost for the small amount of work involved.
During this whole time, the fan was set to the auto setting, Nvidia's GTX 580 cooling system being particularly efficient throughout my tests, although the system got pretty noise at times.
This is however a normal thing to happen since it had to blow out an increased amount of heat, the fan reving up just for a few seconds once in a while, quickly returning to its regular ear-friendly ways, something that we'll cover in more detail in our upcoming review.
Until then I'll leave you explore your GTX's 580 overclocking potential, so please drop me a line and let my know how things worked out for you.