 14 DAY TRIAL //
 Hidden Preference Power. When you want an application to fit the way you work, for instance, you may want your Dock to appear on the left side of your screen, or prefer Microsoft Word to save files as Web pages - a trip to its Preferences dialog box often does the trick. But if the option you seek isn't there, it might be time to roll up your sleeves and edit the preferences yourself.
These unassuming files (also known as .plist files) often hold the keys to hidden features. To edit your preference files, you can use Apple's free utility Property List Editor (for alternatives, see http://mac.softpedia.com - "System Utility Section"). It's part of the Developer tools package that comes on the Tiger installation DVD. Once you install this, you'll find Property List Editor at the root level of your hard drive in the /Developer/Applications/Utilities folder.
Before making any changes to a .plist file, be sure to make a backup copy of it.
Change Your Screen-Capture Format
An upgrade of Mac OS would not be complete without Apple changing the graphics format for screen captures (the files you create by pressing Command-Shift-3 or Command-Shift-4). Apple did it again with Tiger, changing the default from Panther's PDF to Tiger's PNG. But you might prefer to have screenshots saved by default as JPEGs for your Web site or TIFFs for your book publisher. To change the format, follow these steps:
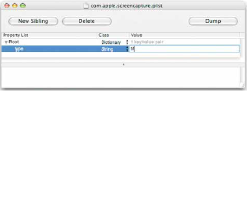
1. Use Property List Editor to open the com.apple.screencapture.plist file (in /your user folder/Library/Preferences). (If you can't find this file, skip to the next set of steps.) 2. Select Type in the Property List column (to reveal it, you may have to click on the disclosure triangle next to the Root item). Replace the term png in the Value text field with the file format of your choice. For example, you could use jpg, tif, or pct. Three-letter abbreviations for file types work most reliably. Also, keep everything lowercase. 3. Save the file. You'll need to log out and log back in for the change to take effect.
There is one hitch. If you've never changed the file format before, the .plist file may not exist. Don't worry. You can create one yourself.
1. Open Property List Editor and choose File: New. 2. In the window that appears, click on the New Root button. 3. Select the newly created Root item and click on the disclosure triangle to the left of its name. 4. Click on the New Child button. 5. In the newly created property, replace the words New Item with type. (Make sure it's lowercase.) 6. Type your desired file type (for example tif) in the Value text field. Use the three-letter abbreviation, and keep everything lowercase. 7. Save the file in /your user folder/Library/Preferences with the name com.apple.screencapture.plist. Log out and log back in to see the changes.
Hide Your Desktop
Say you want to temporarily conceal your desktop clutter, perhaps for a demonstration you're giving or so you can take a screenshot without revealing your mess. Or maybe you're looking for an April Fools' Day prank to play on an unsuspecting friend. If so, try this:
1. Open the com.apple.finder.plist file (in /your user folder/Library/Preferences) in Property List Editor. 2. Select the Root item in the Property List column and click on the disclosure triangle to the left of its name. Click on the New Child button. Replace the words New Item with CreateDesktop. Select Boolean from the Class pop-up menu and No from the Value pop-up menu. 3. Save the file. 4. Hold down the option key and click on the Finder icon in the Dock. In the contextual menu that appears, choose Relaunch.
Everything on your desktop will vanish. Windows from other open applications may remain, but that's it. You can't even drag anything to the desktop. Don't panic - all your files are still there. Check by clicking on the Dock's Finder icon to open up a Finder window and then navigating to the Desktop folder in your user folder. To make your desktop reappear, reopen the .plist file and change CreateDesktop's No value to Yes, and then relaunch the Finder.