Timeline is a new feature coming to users with Windows 10 Spring Creators Update, allowing them to manage their past activities in a more effective manner.
Basically, what Timeline does is create snapshots of your activity, like loaded websites, launched apps, and edited documents, and then allow you to restore a session with just a click. This means Windows collects activity history information and saves it for later use, just in case you want to return to a previous snapshot at a certain moment in the future. Here’s how Microsoft describes Timeline:
“ We know that it can be difficult to get back to stuff you were working on in the past. If you’re like us, you might sometimes forget which site or app you were using or where you saved a file. Now you can finally close apps without worrying—with Timeline, you can get right back to where you left off. Timeline introduces a new way to resume past activities you started on this PC, other Windows PCs, and iOS/Android devices. Timeline enhances Task View, allowing you to switch between currently running apps and past activities. ”
Timeline is integrated in Task View and can be easily launched right from the taskbar. But needless to say, just like it happened with Cortana when it made its debut in Windows 10, there’ll be users who won’t be interested in Timeline, so disabling it would be the first thing on their agenda.Hiding the Task View (and the built-in Timeline feature) is easy, and you only have to right-click the taskbar and then click the option that reads Show Task View button. The same thing for Cortana, only that the digital assistant has its own subsection in the taskbar section.
On the other hand, it’s important to know that this doesn’t disable Timeline nor Task View, but instead hides the button from the taskbar and nothing more.
To disable Timeline, there are two different methods that you can use, neither very straightforward though.
Method #1 – Using the Settings app
Timeline is indeed part of the Settings app, but as compared to the other features that are included in Windows 10, there isn’t a very intuitive method to enable to disable it.
In Windows 10 Redstone 4 (Spring Creators Update), you need to go to the following path to turn off Timeline:
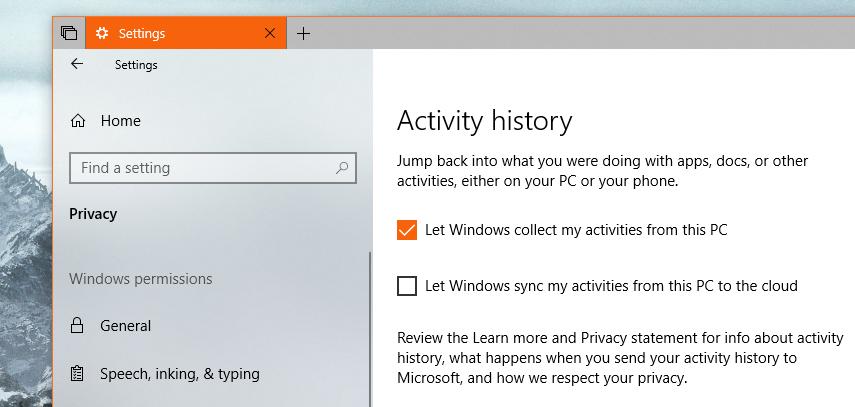
Settings > Privacy > Windows permissions > Activity history > Disable “Let Windows collect my activities from this PC”
Timeline isn’t specifically mentioned in the Settings app, but the Activity history section is the one managing its options, so if you uncheck this entry you should be good to go.
Method #2 – Using the Registry Editor
The second method involves the Registry Editor, and you need to create a backup before everything else because doing something wrong can affect system stability and performance.
Launch the Windows Registry Editor by hitting Win key + R and then type regedit. If a UAC prompt shows up, hit Yes to continue. In the Registry Editor, navigate to the following path:
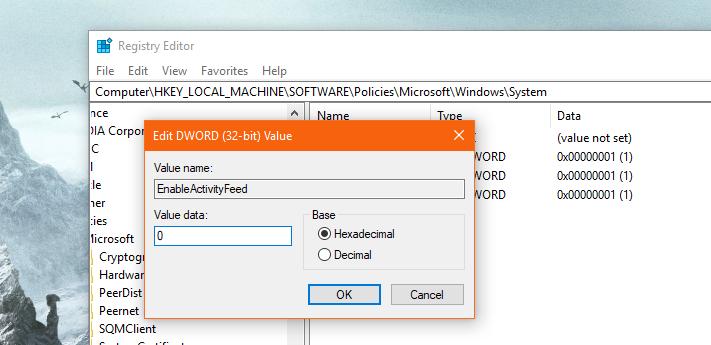
HKEY_LOCAL_MACHINE\SOFTWARE\Policies\Microsoft\Windows\System
What you need to do here is create a new registry key that would essentially disable Timeline. So right-click the right panel and go to New > DWORD (32-bit) Value and call it EnableActivityFeed. Enter value 0 and then close it.
If this particular entry already exists on your system, the only thing you have to do is change its value from 1 to 0.
Reboot your system and then Timeline should no longer be available in the Task view section in the taskbar. If you want to re-enable Timeline at a later time, it’s enough to simply change the value of the registry key mentioned above to 1 or just delete it completely. Also, you can refer to method #1 should you want to enable it a bit faster.

 14 DAY TRIAL //


