14 DAY TRIAL //
 You may have encountered File Access Denied or Folder Access Denied errors when working on Windows computers and trying to rename, delete or simply read a file or folder , even if you're the PC Administrator. This may surprise you, but the Administrator doesn't have access to absolutely everything.
It isn't a bug, but a Windows security measure to prevent malware as well as other people currently logged into your Administrator account from modifying system settings that would likely lead to data corruption. However, there is a workaround for gaining access to files that only the System account can control, in order to view, modify, edit and delete items: taking ownership.
In the following guide, we're showing you how to take ownership in several ways: by resorting to the Windows built-in settings without third-party apps, as well as using Ownership and TakeOwnnershipPro, which cut to the chase and let you become the owner of multiple files and folders at the same time.
Note that you cannot take ownership without administrative rights. Before getting started, create a system restore point to make sure you can revert Windows to a stable state if it has issues.
Windows Security
Right-click a file or folder, select Properties, go to the Security tab, and click the Advanced button. In the Advanced Security popup window, click Change next to Owner, type the name of your Administrator account in the next panel, click Check Names and then Ok. Notice that the Owner's name is now changed to your Administrator account, and that a new option is available below.
Tick the Replace owner on subcontainers and objects box, then click Apply, Yes in the Windows Security popup window and Ok for confirmation. Exit all these panels and right-click the item to go to Properties -> Security tab again. Notice that your Administrator account is now displayed in the Group or user names dialog (with all permissions allowed). Now you should be able to perform file operations without getting access errors.
All these steps can be done even if you are currently logged into Windows using a non-Administrator (Guest) account. Even in this case, it's mandatory to set the Administrator account as the Owner (otherwise, the Guest account won't have permissions). After completing the steps, it's necessary to enter the Administrator's credentials when prompted by Windows Security to view, edit or delete the files or folders.
Ownership
The downloaded package of Ownership contains two .exe files: Ownership (for 32-bit Windows) and Ownership64Bit (for 64-bit Windows). Launch the one that corresponds to your operating system and click Install in the popup window.
The application is now integrated into the context menu. Right-click one or more files or folders, and select Take Ownership; it's accompanied by the administrator icon. Click Yes for confirmation when prompted by User Account Control (UAC), which shows up for every selected item.
A command-line panel briefly appears on the screen. Now you should have ownership of the objects, so feel free to view, edit or modify them. To remove Ownership from the right-click menu, launch its .exe file and click Uninstall.
TakeOwnershipPro
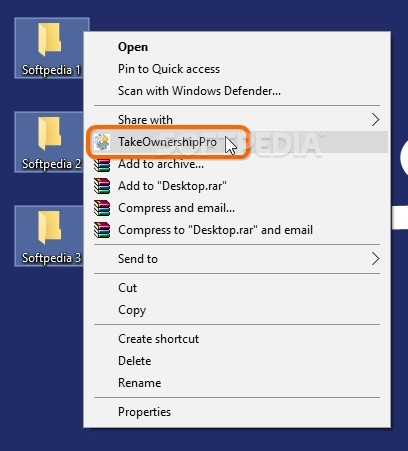
After setting it up, TakeOwneshipPro gets automatically integrated into the right-click menu of files and folders. Just like Ownership, it works even if you select two or more files or folders at the same time to open the context menu. Select the TakeOwneshipPro entry and click Yes when prompted by User Account Control (UAC).
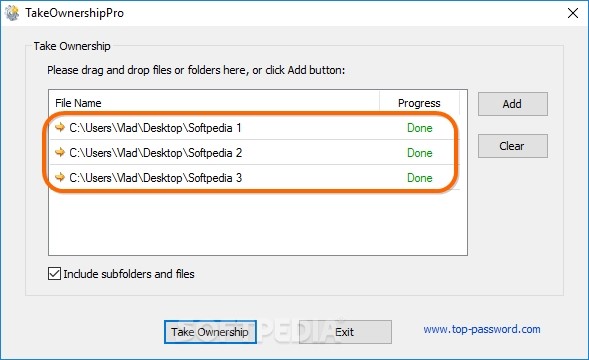
Next, the main app window is brought up to the screen, where the full path of the selected item is shown, along with Done in the Progress column (this means that you have successfully taken ownership of the object).
Click the Add button and use the integrated tree view to add more files and folders to the task list, or drop them into the empty area from Windows Explorer. By default, you also take ownership of the containing files and subfolders. If you want to prevent this, clear the Include subfolders and files box. Click the Take Ownership button to apply modifications.
Play our video guide to find out how to take ownership using these three methods. You can also download Ownership and TakeOwnershipPro.
Fix "File Access Denied" Errors by Taking Ownership
Learn how to take ownership to view, edit and delete files and folders, even if you are the PC Administrator, using Windows Security as well as two apps. Read our article for more info: http://www.softpedia.com/blog/fix-file-access-denied-errors-by-taking-ownership-505279.shtml