 14 DAY TRIAL //
 GNU Screen is a free terminal multiplexer that allows console users to run any number of text-based applications, interactive command shells, curses-based applications, text editors etc, within a single terminal. Similar to VNC, screen enables you to start applications from one computer, reconnect from another computer and continue using the same application without having to restart it. If you are one of those Linux users that keep several console sessions opened at all times, you should really give screen a try. Screen also has the ability to keep the application running even after you have accidentally closed the terminal, logged out or even had a connection drop and allows you to later reattach to it, resuming your work right from where you left it.
Another powerful screen feature is its session sharing ability. Screen enables several users to connect to the same session at once, allowing collaboration between them by sharing the same console. Most likely, this feature is mostly being used for teaching and explaining purposes this way: the 'teacher' starts the screen and several 'students' will attach to that session, watching the 'teacher's commands and actions. The problem with this feature it that screen's documentation doesn't offer an obvious how-to use it. But I?ll try to explain it later on. First, with the basic commands.
Creating and switching between sessions
First of all, start a fresh screen session:
To create a new window, type Ctrl+a (to get screen's attention) and then press c (create).
Now, try to switch between them using either of the following methods: 1. Press Ctrl+a, then n to switch to next window and Ctrl+a, then n to switch to the previous one. 2. Press Ctrl+a, then a number from 0 to 9, to switch to the corresponding window. 3. Press Ctrl+a, then " (Shift+') to get a full-screen list of windows. You can navigate through this list with the up and down arrow keys and select the window by pressing Enter while highlighted. Also, Ctrl+a and w will give you a non-interactive list of windows.
To rename a window for easier recognition, press Ctrl+a, then A (that's an uppercase a so either press shift+a or enable capslock and press a) while attached to a session. You will be prompted for a new window name.
To kill not responding programs, use Ctrl+a K.
Detaching and reattaching
After playing a little with basic screen commands, you should now at least know how to create a screen session, so create one if the ones earlier were ended.
To detach from this session, press Ctrl+a d. Or, in a more improper way, just close the terminal that contains the session, but keep in mind that neither of these methods actually end your session, all they do is unbind your session from the current terminal. So basically, if you had a program running while pressing Ctrl+a d, that program is still running and you can resume working with it at any time.
To re-attach to a detached session, open a terminal and type
There are several suitable screens on:
4870.pts-4.localhost (Detached)
4638.pts-1.localhost (Detached)
To share a terminal with one or more users, you have to:
1. Set the screen binary setuid root:
It may not be immediately obvious to the new screen user, but this is one of screen's key features. You won't be able to use your terminal's scroll features while using screen so you'll have to use screen's copy mode.
To scroll back through screen's history, first enable the copy mode by pressing Ctrl+a [ . Now, use either one of the arrow keys, page up, page down, home and end keys to scroll through screen's history.
Pressing Enter will start marking text for copying. Pressing Enter again will copy the selected text into the clipboard. Now, to paste that text, press Ctrl+a ].
Moreover, screen has the ability to log its output to a file on the disk. To enable screen logging, press Ctrl+a H to enable it and again to disable it. By default, the log file will be saved as $HOME/screenlog.1 .
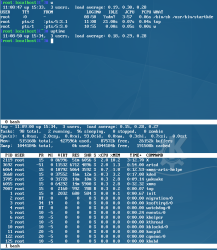
Splitting the screen in half horizontally
Screen has the ability to split the window into two or more half horizontal windows. This feature will enable you, for example, to work in a half screen, while viewing the system resources ("top") in the remaining half.
To split the screen in two, first create two screen sessions. Then press Ctrl+a S which will split the screen in half, giving you a session on the top that you're already using and a blank session at the bottom.
To move to the bottom half, press Ctrl+a, then the TAB key. This key combination will move the console cursor to the lower half. Once in the blank half, you have to set this bottom half of the screen to use one of the two earlier created sessions. To do this, press Ctrl+a, then " (shift+'). You will be presented with a list of available screen sessions, pick one using the arrow keys (be careful not to pick the one already at the top or you'll have a mirror console), and activate it by pressing Enter. Now type top and switch to the upper half by pressing again Ctrl+a TAB. You should now have a bash prompt waiting for commands in the upper half and system resources monitoring in the bottom half.
To return to full size screen, switch to the half you want it to remain and press Ctrl+a Q.
Exiting the screen
This is the easiest part. Close any running programs in your screen session and type exit. Do this for each detached screen session.