14 DAY TRIAL //
 After reading this article you will know how to use Safe Mode, Disk Utility and fsck for fixing the errors preventing a Mac to boot normally.
If you have used Macs long enough you must have heard of people having problems booting up their machines from time to time. For instance their Macs start up but they either won't reach the OS X login screen or reach it but fail to load the Mac OS X Desktop after logging in.
In other cases the Mac only partially start and then it displays a command line in a text-only environment, such as ”file system dirty, run fsck”.
These problems may appear after a forced restart, an improper shutdown, or power interruption. Because all of these situations may be experienced by any Mac users, you will, eventually, come across one or more of the described boot issues.
If one of the above has also happened to you, you may have to take matters in your own hands and give this step-by-step guide (also detailed by Apple on their support website) a spin.
Here you will find step-by-step instructions on how to use a disk repair utility to fix your Mac’s boot issue. OS X comes with two utilities for this: Disk Utility and fsck (a command-line utility).
These two tools can also be used if you want to just check your Mac’s disk for any errors. You can also use these even when your everything is OK with your Mac, but you just want to check the disk for possible file system issues.
The Safe Boot solution
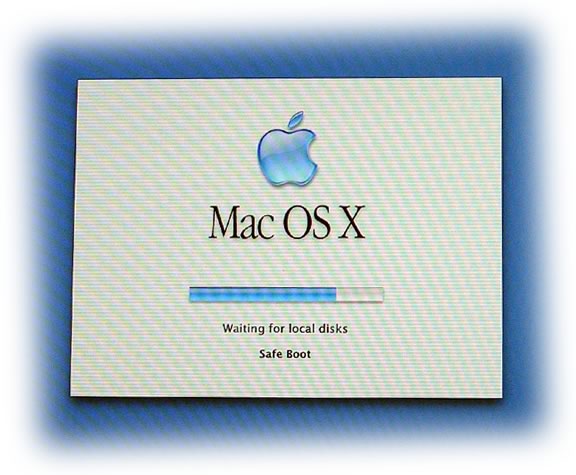
On Mac OS X 10.2 or later, you can boot your Mac in Safe Mode (hold the Shift key as your Mac starts up), which includes an automatic disk check and repair.
A Safe Boot, which will put your Mac Safe Mode, allows you to start up your machine successfully using only a reduced version of the OS.
After the OS has fully started up, you only have to restart again normally and everything should now be OK. If the issue that made you Safe Boot persists, try the Disk Utility solution.
The Disk Utility solution
These are the steps to follow for fixing your Mac using the Disk Utility tool:
1. Insert the Mac OS X Install disc, and then restart the Mac while holding the C key.
2. After starting up, choose Disk Utility from the Installer menu. (If you run Mac OS X 10.4 or later, you must select your language first).
Important: Do not click the Continue button in the first screen of the Installer. If you do, you must restart from the disc again to be able to access Disk Utility.
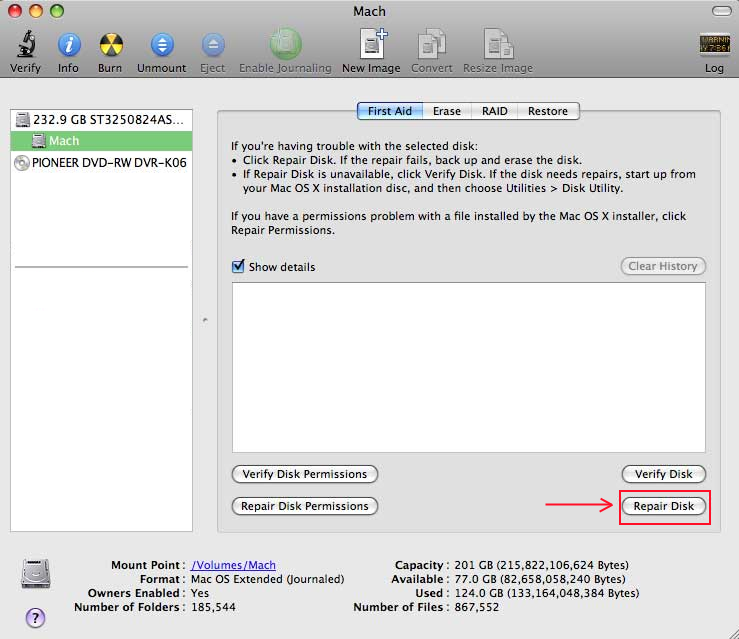
3. Click the First Aid tab and then click the disclosure triangle to the left of the hard drive icon to get a list containing the names of your hard disk volumes and partitions.
4. Select your Mac OS X volume and click Repair. Now Disk Utility will check and automatically repair your disk.
The fsck solution
If you cannot start up your Mac Safe Mode or use Disk Utility while started up from a disc, you will need to use fsck. fsck is a command-line based tool which can help you verify and repair a disk.
These are some of the situations in which using fsck may be necessary:
- The Mac OS X disc is not available. - The optical drive is not available. - You are not able to start using a Safe Boot.
fsck must be run from the command line and these are the steps you will have to follow:
1. Start up your Mac in single-user mode (press the power button and immediately press/hold the Command (Apple) key + the "s" key) to reach the command line.
Note: If you cannot start your machine you will have to perform a forced restart. On a desktop based Mac you will have to hold down the power button for several seconds.
On portable computers, simultaneously press the Command-Control-power keys. If your portable computer does not restart using this method, you may have to reset the Power Manager (use the Apple support guide available here).
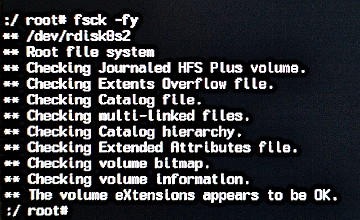
2. At the command-line prompt type “/sbin/fsck –fy” and press return. fsck will now go through five "phases" and automatically return information about your disk's fragmentation and use.
Once this process is finished, fsck will display the ** The volume (name_of_volume) appears to be OK message if no issue is found. If fsck has found any issues and has fixed anything on your disk, it will display this message: ***** FILE SYSTEM WAS MODIFIED ***** NOTE: If the second message appears, you will have to repeat the command typed at step 2 until fsck will tell you that your volume appears to be OK (you have to do this because first-pass repairs may uncover additional issues).
3. When fsck reports that your volume is OK, type reboot at the prompt and press Return. Your Mac should now start up normally and allow you to log in.
Although the fsck command-line utility might be the answer in some cases, if your Mac's OS X uses a Mac OS X Extended (Journaled) formatted volume (as is the case for all OS X 10.3 or later versions) you probably will not need to use fsck.
However, if you'll decide to use it for any reason, please be aware that benign error messages might appear (as described by Apple in this support article).
To find out how your volume is formatted and if you cannot boot your machine from the Mac OS X volume, type the following command at the command-line and press Return: "diskutil info /". If a "File System: Journaled HFS+" message is displayed, you do have a Journaled volume.
If you have encountered errors while following the above procedures or have any other methods for fixing boot issues on a Mac, leave us and the other readers a word in the comments section below.
We will try our best to give you a possible solution for your problem or give your alternate repair method a spin if we will ever experience similar problems.