14 DAY TRIAL //
 If under various circumstances you had to install a second Windows OS on the same system, you should have already met the dual boot option. For those who do not know, the dual boot option appears when two or more Windows systems reside on the same computer at the same time. It will pop up before booting the system permitting the user to select which OS will boot.
This option is very useful for those who own computers with older mainboards that do not provide a quick boot selection option. Newer motherboards have this option by default and whenever two or more operating systems are available, you can simply press an F key which will determine a Bios window to emerge offering you the possibility to select the desired drive to boot.
I must confess that I am a fan of the quick boot option provided by these motherboards. In case I want to format the second HDD that stores the second Window, I can do it without needing to edit the dual boot option. Just removing the second OS won't determine the dual boot option to disappear.
It will be still shown before booting although there is just one OS available. Very unpleasant I can say.
My advice, in case you want to use only the quick boot option (not the dual boot), is that when you install the second OS, make sure you remove the IDE/SATA cable for the HDD that holds the primary Windows. Because of this, the installation won't detect that you already have a primary OS installed and won't enable the dual boot option. Otherwise, the cables plugged into the primary HDD will automatically enable it.
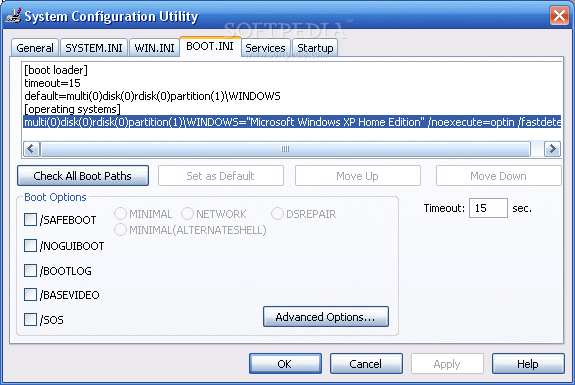
Boot.ini, the house of the dual boot option
Boot.ini is a system file found in the system root. Because it has a major importance for the booting process, Windows developers gave it hidden, system and read-only attributes. Don't worry though, you can easily view it and even change the attributes by yourself. Just go to My Computer/Windows Explorer > Folder Options > View and check "Show hidden files and folders".
How to edit Boot.ini
Let's assume that you have the dual boot option enabled and because your second HDD broke down or you simply formatted it losing the second operating system, you want to get rid of the dual boot option. To do it, you need to edit the Boot.ini which can be done in multiple ways.
Manual edit using the Notepad or any other text editor
Being a plain text file editor isn't a big deal, as all it takes is a simple text editor. Therefore, the common Notepad provided by my Windows would be more than enough. First of all, remove the read-only attribute because you need to save the file after you have edited it. Because we are dealing with an important system file and any mistake would lead to the impossibility of booting the system, be smart and make a backup copy. In case something happens, you can copy back the file from another source such a floppy, USB flashpen or other HDD.
Comfortable method to change the "timeout"
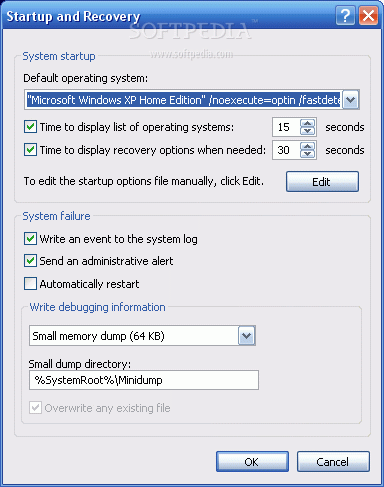
When the dual boot option works, you are provided with a timeout in order to select the desired OS. By default, this timeout is 30 sec. If no OS is selected, after 30 seconds, the primary Windows will boot. In case you consider the timeout too high, you can lower it.
Go to Start > Run and type msconfig. Once the system configuration window pops up, you will notice that Boot.ini has its own tab. Select that tab and where you see "timeout," set it to a lower or higher value.
Remove/Add Operating Systems in the dual boot menu
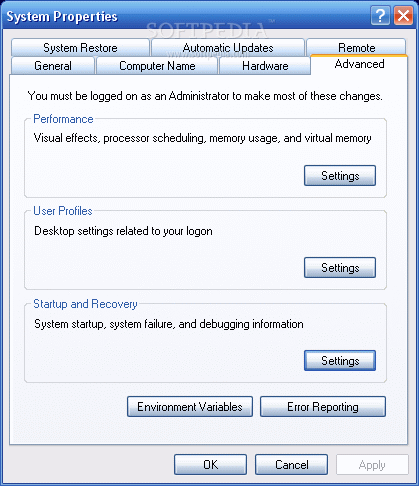
This is the main issue. How to remove a dual boot option from the menu? Right click on My Computer icon and select Properties. From the properties window go to Advantage > Startup and Recovery > Settings. Here, you can both edit the timeout value and modify the Boot.ini file by clicking Edit. If you remove the second operating system from Boot.ini, the dual boot option won't appear before booting.
Don't forget to backup the file in any situation. It will keep you out of trouble!