14 DAY TRIAL //
 Getting Node.js to run on Windows may be a trivial task for seasoned veterans, but for people going through this experience for the first time, Node can be quite overwhelming since it totally differs from what programming books and online tutorials have told them about JavaScript.
All of a sudden, from a simple scripting language interpreted in the user's browsers, JavaScript can be executed on servers and deliver content to users in real-time, asynchronously, and in a non-blocking nature. This provides an extraordinary boost of speed compared to classic LAMP stacks, but can also be a little difficult to get into.
We won't delve into a deep analysis of what Node.js can't do properly, but what's important is that it can handle high-load traffic with the best technologies around, being a favorite tool at companies like Yahoo, Uber, PayPal, eBay, and recently even Microsoft.
But before you'll get your first Node.js programming job, before you'll get to experience what some programmers refer to as “callback hell,” you will have to take your first steps with Node. So, let's get started.
The installation process
Step 1: Download Node.js
Step 2: There are installers for 32bit and 64bit Windows versions. Grab the one appropriate to your PC's architecture and run it.
Step 3: Press “Next” through the first screens, past the License Agreement, and get to the “Destination Folder” section.
Node.js is not portable, but that doesn't mean you have to install it in the classic “C:\Program Files\nodejs\” folder.
As a developer, you should be organized and develop time saving techniques. One of them is keeping all your code in neatly organized projects.
You can start a Node.js project inside any folder and run a server from it. You can, but you shouldn't! You should be a pro and put all your projects in a single folder, and a technique is to create a special “\projects” folder inside the Node installation folder and work from there.
So just install Node to something like “H:\node\”. Now Node will be installed into its own folder, in the root of a new hard-drive, where you can create a “\projects” folder later on. This avoids situations where you'll have to type long address paths for switching between projects hosted in different places. Like this, everything is stored in one directory, and if you ever found yourself somewhere else on your hard-drive, you'll easily remember where Node and your "\projects" folder is.
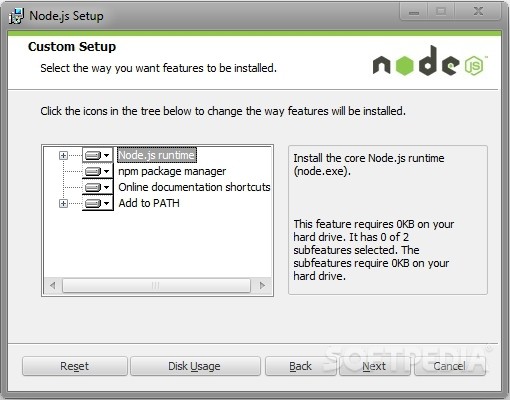
Step 4: The next installation screen is the “Custom Setup” section, which for starters you should leave intact. It contains basic settings which I never heard anyone want to turn off so far.
Step 5: After this, just press the following “Next” options and the installer will do his job. A restart isn't required, but we generally recommend it if you plan to start actual work instead of just playing around with the engine.
Creating the Node.js command-line shortcut
So what you've got right now is a Node.js engine that can interpret the JavaScript files you tell it to. But how do you do this? The answer is via the Windows command-line. You won't find anything usable in the Node.js installation folder, so what you need to do is to add a Windows Command Prompt to your desktop and/or taskbar.
In Windows 7 and 8, this can be done by going to “C:\Windows\System32”, right-clicking the “cmd” application and then selecting “Send to → Desktop”.
Once you've got an easy way to reach a command prompt window on your desktop, it's time to customize it and make it point to Node.js, and more specifically to the “\projects” folder we've told you a few paragraphs above.
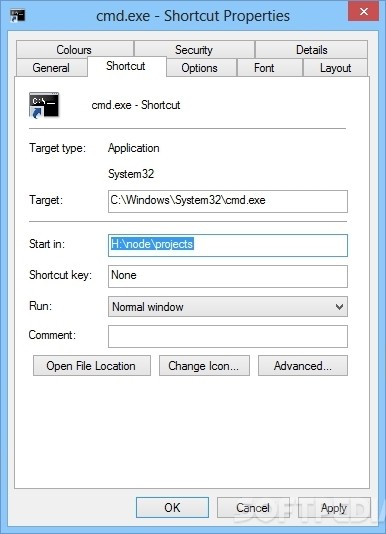
Right click the command prompt icon and select “Properties,” this will open a new window where you'll need to add the location of your Node.js engine and the folder we'll be working on to the “Shortcut” tab in the “Start in” section. This should be something like “H:\node\projects” (for our example).
What this does is force this particular instance of the command prompt window on your desktop to open with that specific folder path already selected, ready to work.
Beautifying the Node.js console
The next steps are optional, but it will help you replace the classic command prompt icon with Node's logo, so you'll know what you're starting when double-clicking the command prompt instance.
In the same "Shortcut" tab as described above, select the “Change icon...” option, hit “Browse” in the next dialog, navigate to the Node.js installation folder and choose the node.exe file. Save all the dialogs and this will replace the command prompt icon with the Node.js logo.
Now if you double-click this new icon, you'll start a new Node.js CLI directly into your “H:\node\projects” folder. Here you'll be able to download, install, and start projects without making a mess of your entire computer, or having to jump from one location on your hard-drive to another just to start one app or another.
Since almost all the Node.js environment is deeply integrated with GitHub, and GitHub is a service for Git-based project hosting, we also recommend installing Git on your PC.
Since Git's command-line interface is also much more colorful, we recommend going through the same steps as before, but using the command prompt window found in the Git installation folder instead of the default Windows command prompt.
Updating/upgrading Node
Node.js doesn't come packed with an automated update mechanism, so if you ignore this you'll soon find yourself working with an outdated Node engine pretty fast. Joyent has been doing an excellent job at keeping its technology patched and up to date, so you'll have to upgrade Node.js regularly yourself.
While this can't be done from the command-line like with some Linux instances, the update procedure on Windows computers is quite simple. All users need to do is download the latest Node.js version and run the installer again, on top of the same installation path.
Testing it out!
This concludes our short tutorial about getting Node to run on Windows, and the quickest way to test if everything is up and running with your Node.js server is to run a random command. Just type “node -v” in the console and see if your current Node.js version number is printed out. This should tell that the engine is up and running, answer user commands.

Running a JavaScript file on the server is as easy. Just create a filename.js file, add some JavaScript code to it and then run it in the console like "node filename.js". This will feed the file you created through Node's JavaScript engine and based on what commands it finds, something will happen. A basic script to print something on the console looks like this: