 14 DAY TRIAL //
 If you want to test the new version of MySQL without compromising your existing MySQL settings, you can run multiple instances of MySQL as services.
You can install MySQL services using the --install or --install-manual option:
- If you don't specify any service name, the server will use the default service name of MySQL and the options from the [mysqld] group in the standard option files. - Specify the service name after the --install option and the server reads options from the group that has the same name as the service. The server reads options from the standard option files. - If you want to read options only from the [mysqld] group of the named file, specify a --defaults-file option after the service name and the server will ignore the standard option files;
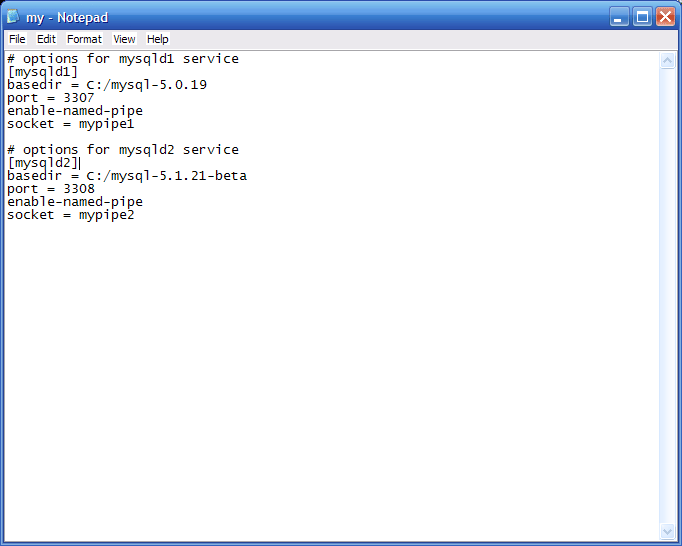
To begin, setup my.cnf file to look like this:
# options for mysqld1 service [mysqld1] basedir = C:/mysql-5.0.45 port = 3307 enable-named-pipe socket = mypipe1
# options for mysqld2 service [mysqld2] basedir = C:/mysql-5.1.21-beta port = 3308 enable-named-pipe socket = mypipe2
The next move is to install manually the services using the following commands:
C:> C:mysql-5.0.19 inmysqld-nt --install mysqld1 C:> C:mysql-5.1.21-beta inmysqld-nt --install mysqld2
Then start the services manually:
C:> NET START mysqld1 C:> NET START mysqld2
Another way is to create different configuration files: C:my-opts1.cnf and C:my-opts2.cnf . For mysql 5.0.45 the config will look like that:
[mysqld] basedir = C:/mysql-5.0.45 port = 3307 enable-named-pipe socket = mypipe1
and for mysql-5.1.21-beta the configuration file will look like this:
[mysqld] basedir = C:/mysql-5.1.21-beta port = 3308 enable-named-pipe socket = mypipe2
Create the services using the following commands:
C:> C:mysql-5.0.19 inmysqld-nt --install mysqld1 --defaults-file=C:my-opts1.cnf C:> C:mysql-5.1.21-beta inmysqld-nt --install mysqld2 --defaults-file=C:my-opts2.cnf
After that, start the services manually as explained above.
If you want to remove the services, use the mysql --remove option.