14 DAY TRIAL //
 One thing Apple is renowned for, aside from its late co-founder Steve Jobs and the company’s iconic designs, is the restrictive nature with which it handles some of its products. iOS is a very good example of that. Apple only allows apps that meet certain guidelines to run on it.
Even with so many restrictions, the App Store is teeming with apps of all kinds. None, however, is able to record the screen and spit out a video. But there’s desktop software that can do that, and while most of these solutions cost money, there’s one that doesn’t cost a dime: QuickTime.
There’s a thread on Apple Support Communities titled “How do you record your iPhone's screen?” It’s only three pages long but it’s been viewed 184,000 times, suggesting that people are in dire need of a solution to record their screen. If that’s you, here’s a cheap and easy way to do that.
Recording your iPhone’s screen with QuickTime
Although QuickTime doesn’t mark taps or swipes on the screen, it’s the simplest and cheapest way to churn out a quick iOS recording for a guide, a demo, or whatever. Plus, how hard can it be to guess what the user is tapping on, honestly? Right, here we go.
Step 1 – Connect your device
Grab your iPhone / iPod touch / iPad and tether it to your Mac. Yes, this only works on Mac. If iTunes launches, close it. In fact, anything that has been rigged to launch automatically when your iDevice is connected should be closed. Right. Proceed to the next step now.
Step 2 – Launch QuickTime
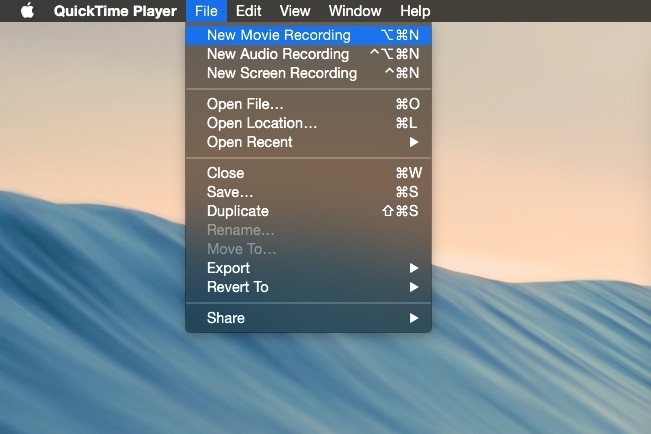
The first thing you need to do is check if you have QuickTime X (QuickTime 10) or newer. If QuickTime X is what you have, launch it and wait for it to display the Finder window asking for a source file. Ignore that and shift your view to the menubar. Choose File and select New Movie Recording.
A dark window should appear with a spinning thingy in the middle indicating that it’s trying to load something. It might even turn on your Mac’s built-in iSight camera, depending on how the app is set by default.
What you want to do now is go to the bottom of this video preview window and click the small arrow next to the record button. Yes, the one pointing downwards that you can hardly see. Click it and it will display the video and audio sources, as well as the quality of the output video. Select your iDevice in both areas if you want audio and video recorded in your demo, and choose your preferred quality.
Step 3 – Hit Record
Once you’ve done all this, your iDevice should already appear in the preview window. If not, it may need a small boost, so go ahead and unlock the thing to display your Home screen. At this point, you should be able to start your recording.