14 DAY TRIAL //
 If you want an easy method to install the drivers for your Nvidia or ATI/AMD graphics card, then this guide is for you. The guide uses the Livna Nvidia and ATI/AMD drivers because they are especially designed for Fedora 7 systems and it will come with a small python script, which works as an extension to system-config-display, doing all the editing of the Xorg configuration file for you while installing/activating the driver.
The Livna repository must be installed on your Fedora 7 OS, so follow the instructions below to add the Livna repository into your system.
Open a terminal by right clicking on the desktop and choose the first option "Konsole...". Type:
su -
you must type the root password now (the one you have set up when you've installed Fedora). Then, as root, type:
rpm -ivhU http://rpm.livna.org/livna-release-7.rpm
Now the Livna repository is installed and you can continue with the driver installation part.
How to install Nvidia drivers
I presume you did not close the Konsole window; if you did close it, fire it up by right clicking on the desktop and choose the first option, "Konsole...". Log in as root and type:
yum -y install kmod-nvidia glx-utils
The above command will install the video driver for newer Nvidia cards. If you have a very old Nvidia card, then you should type this command:
yum install kmod-nvidia-96xx
or
yum install kmod-nvidia-legacy
To verify if the installation was successfully completed, reboot your computer. You should see the Nvidia logo for a second or two before the log-in screen appears. Log back in and then open up Konsole and type:
glxinfo | grep direct
If the output of the above command is: direct rendering: Yes the Nvidia driver installation was successfully completed and you can now use OpenGL applications and desktop effects such as Compiz Fusion.
How to install ATI drivers
Official Installer:
Download the installer from Softpedia, and in the meantime open up Konsole and type:
su -
you must type the root password now (the one you have set up when you've installed Fedora). Then, as root, type:
yum -y install kernel-devel rpm-build gcc
After everything was installed successfully, and assuming that the installer was downloaded, type:
sh ati-driver-installer-8.39.4-x86.x86_64.run --buildpkg Fedora/F7
The RPM packages for Fedora 7 will be generated. When it's done, you should see something like this:
Package /home/marius/ATI-fglrx-control-center-8.39.4-1.f7.i386.rpm has been successfully generated
Package /home/marius/ATI-fglrx-devel-8.39.4-1.f7.i386.rpm has been successfully generated
Package /home/marius/kernel-module-ATI-fglrx-2.6.21-1.3228.fc7-8.39.4-1.f7.i386.rpm has been successfully generated
Removing temporary directory: fglrx-install.yK3790
rpm -ivh ATI-fglrx-8.39.4-1.f7.i386.rpm ATI-fglrx-control-center-8.39.4-1.f7.i386.rpm kernel-module-ATI-fglrx-2.6.21-1.3228.fc7-8.39.4-1.f7.i386.rpm
Install the ATI driver from Livna repository:
Install the Livna repository as explained at the beginning of this guide, then fire up the terminal by right clicking on the desktop and choose the first option, "Konsole...". Log in as root and type:
yum -y install kmod-fglrx glx-utils
The above command will install the video driver for newer Nvidia cards. To verify if the installation was successfully completed, reboot your computer. When you're back, open up Konsole and type:
glxinfo | grep direct
If the output of the above command is: direct rendering: Yes the ATI driver installation was successfully completed and you can now use OpenGL applications and desktop effects such as Compiz Fusion.
ATI driver final adjustments:
For both installation methods the ATI video driver needs a little tweaking in order to work correctly. Still logged in as root, type:
kate /etc/X11/xorg.conf
if you don't have Kate editor installed you can try with
gedit /etc/X11/xorg.conf
search for the ServerFlags section. It looks like this:
Section "ServerFlags" Option "AIGLX" "on" EndSection
and replace the "on" with "off"
Then search for the Extensions section. It looks like this:
Section "Extensions" Option "Composite" "Enable" EndSection
and replace the "Enable" option with "Disable"
And finally, add the following lines to the end of the file:
Section "DRI" Mode 0666 EndSection
Moreover, if you have an Intel motherboard, you will need to add the following line to the Device section, right under the Driver "fglrx" line:
Option "UseInternalAGPGART" "no"
Save the file and close it. To verify if the installation was successfully completed, reboot your computer. When you're back, open up Konsole and type:
glxinfo | grep direct
If the output of the above command is: direct rendering: Yes the ATI driver installation was successfully completed and you can now use OpenGL applications and desktop effects such as Compiz Fusion.
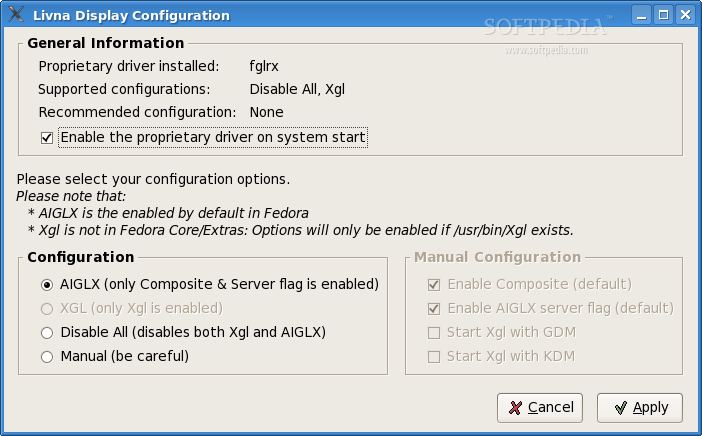
Livna Display Configuration
The Livna Display Configuration script can be accessed from KMenu -> System -> Livna Display Configuration. You will be asked for the root password, so enter it. This very nice script will show you if the driver was successfully installed and it will also offer some useful options, such as the ability to disable the driver temporarily without messing with the Xorg.conf file yourself.
Good luck!
* Last Updated: 30-07-2007
- Added Livna alternative installation for the ATI driver.