
 14 DAY TRIAL //
 The following tutorial will teach all users of the Ubuntu Linux operating system how to install their beloved distribution on the popular Nexus 7 tablet from Google and ASUS.
Ubuntu for Nexus 7 was officially announced by no other than Mark Shuttleworth, the creator of the Ubuntu operating system, back in October 2012, but Ubuntu for Nexus 7 will see an official release this year, in April, accompanying the highly anticipated Ubuntu 13.04 (Raring Ringtail) operating system.
With today's tutorial, we will try to teach Nexus 7 owners how to install the Ubuntu operating system on their tablet.
To begin, you will need to have a healthy and running Ubuntu OS installation, the Android SDK, a standard micro USB cable (the one that came with the Nexus 7 tablet), and, of course, a Nexus 7 tablet (8GB, 16GB or 32GB).
Step 1 – Installing the Ubuntu Nexus 7 installer
So, hit the CTRL+ALT+T key combination to open a terminal window in your Ubuntu operating system and type the following commands, one by one, hitting enter after each one:
sudo add-apt-repository ppa:ubuntu-nexus7/ubuntu-nexus7-installer sudo apt-get update && sudo apt-get install ubuntu-nexus7-installer
Step 2 – Unlocking the Nexus 7 bootloader
WARNING: This step will ERASE ALL THE DATA ON YOUR TABLET. Make sure you've correctly backed up your device before proceeding. You have been warned!
Connect the Nexus 7 tablet to your computer using the standard micro USB cable. Download the Android SDK for your architecture from here and extract the archive on your desktop. In the terminal window, go to the extracted Android SDK directory with the "cd" command and enter the sdk/platform-tools folder. Type the following command:
sudo fastboot devices
You should see your device's ID. If you see it, type the following command:
sudo fastboot oem unlock
Editor's note: If you don't see your device's ID when running the above command, try to run the sudo ./adb devices command instead.
You should see the following screen on your Nexus 7 tablet:
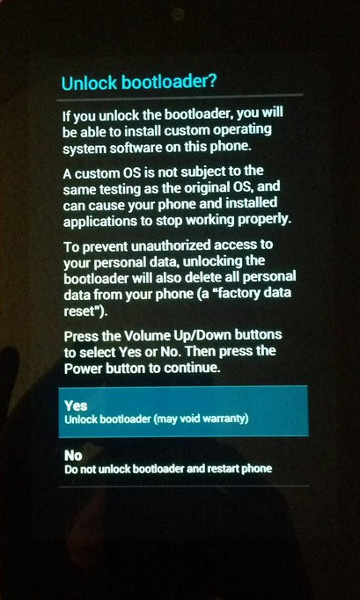
sudo fastboot reboot-bootloader
Step 3 – Installing Ubuntu 13.04 on Nexus 7
WARNING: Before proceeding with the installation, make sure NO OTHER DEVICES are connected to your PC via USB.
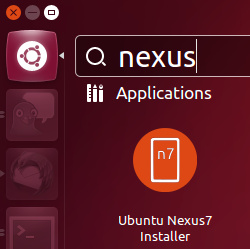
Now, with the Nexus 7 plugged into your computer's USB port, search the Ubuntu Nexus 7 Installer app via Unity Dash and open it.
When the installation process is complete, the Nexus 7 tablet will reboot and finish the actual Ubuntu OS installation, which could take about 10-15 minutes.
That's it! Keep in mind that if you own a Micro USB Host Cable (OTG Cable), you will be able to attach a keyboard and a mouse to your Nexus 7 tablet and use Ubuntu like you use your desktop PC.
For more details watch the video below...
If you encounter issues with the tutorial, do not hesitate to comment below!
Later edit: We've created another tutorial for those of you who want to erase Ubuntu and reinstall Android on their Nexus 7 tablet. https://news.softpedia.com/news/How-to-Reinstall-Android-on-Nexus-7-Removing-Ubuntu-325016.shtml