Softpedia
 

NEWS CATEGORIES:


NEWS ARCHIVE >>
SOFTPEDIA REVIEWS >>
MEET THE EDITORS >>
TRENDING TODAY
Home > News > Linux > Other Tips, Tricks and Tutorials

September 30th, 2009, 17:01 GMT · By

How to Fix Windows 7 Sharing in VirtualBox

SHARE:

Adjust text size:

Network shared folder in Windows 7, on VirtualBox
Enlarge picture
In my last tutorial about VirtualBox (the free virtualization software from Sun Microsystems) I offered a solution to fix the USB support, a problem that I think is fixed now, but... I have recently encountered another issue: sharing folders with a Windows 7 guest machine!

The issue:

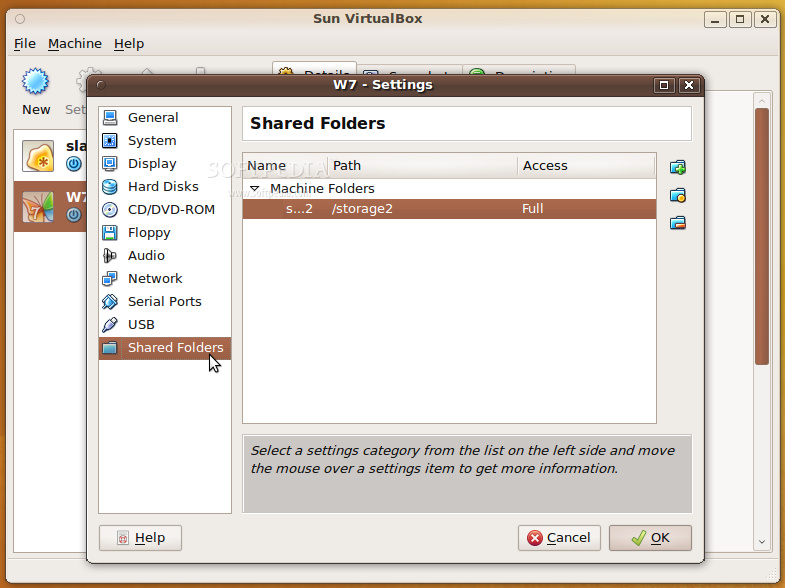
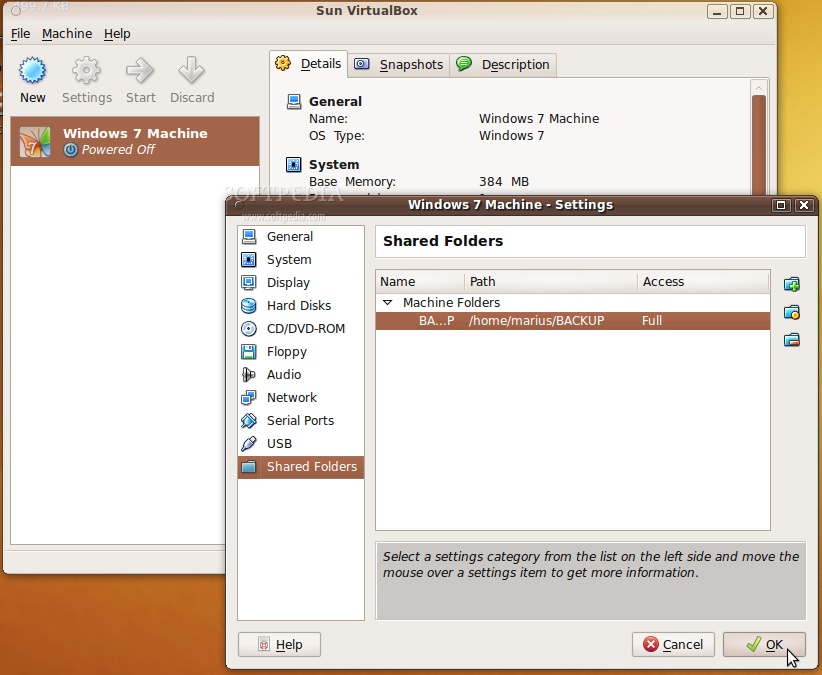
So, what's not working? Well, you set the folder(s) in the "Shared Folders" section of the virtual machine's settings dialog and they will NOT appear in Windows 7, like it works with Windows XP.

The solution:

Like many of you out there, I've searched and searched on the Internet for a solution to this issue, which I've also noticed to be quite popular (why should it be? you create something on the virtual machine and you want to save it, right?), and many guides are incomplete or they point you in the wrong direction. Therefore, I present today  a step-by-step tutorial (with screenshots) to this very simple-to-fix issue (you won't believe how simple it was in the end).

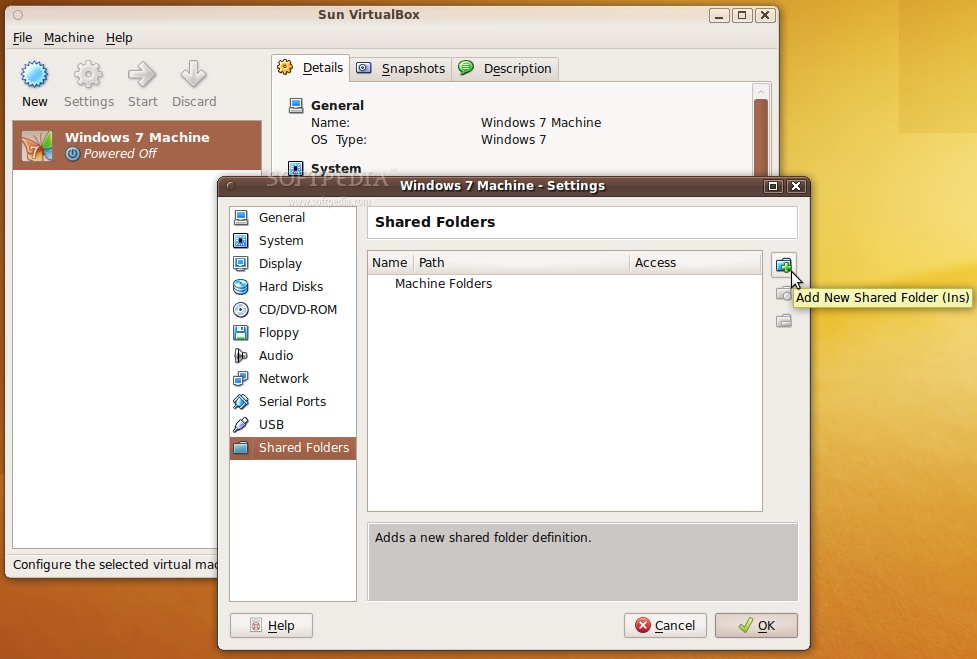
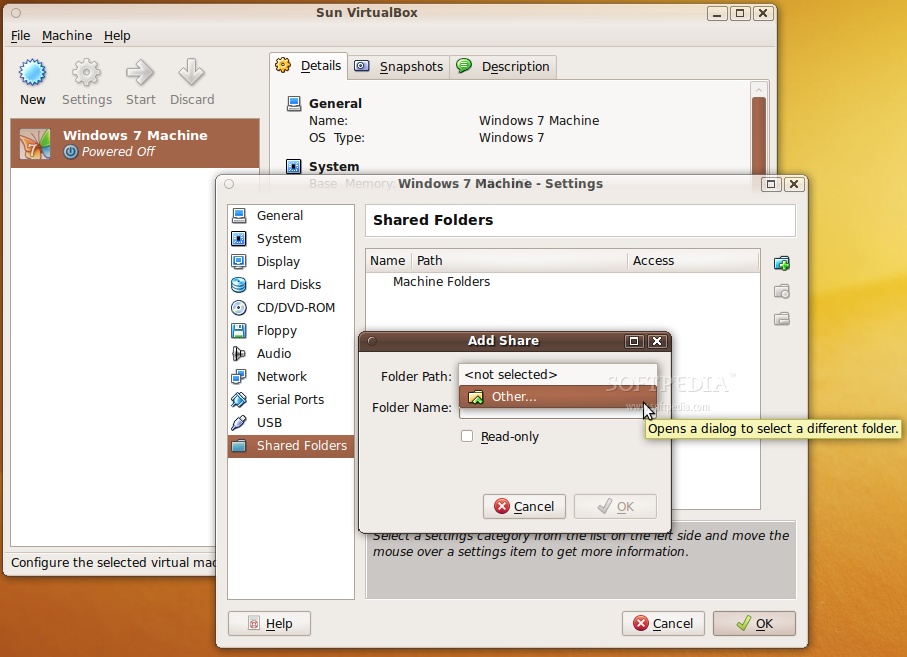
For this tutorial, we've used VirtualBox 3.0.6 and Windows 7 Ultimate, on an Ubuntu 9.10 Alpha 6 machine. The following steps assume that you do NOT have any shared folders added to your Windows 7 virtual machine. If you already have set the folders, just follow the last three steps!

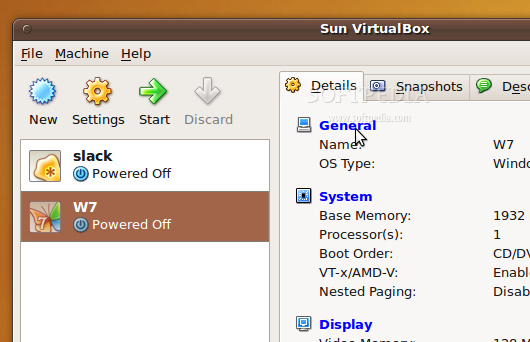
1. Open VirtualBox, and with the Windows 7 virtual machine selected in the left side, click the 'General' button on the "Details" tab.

Review image

2. In the settings window that appears, click the "Shared Folders" entry (last one) and then click on the little folder icon with a + on it (on the right) to add a new shared folder...

Review image
Review image

3. A new dialog appears, called Add Share. Click the arrow on the "Folder Path" field and select 'Other.' Search for the folder you want to share with the Windows 7 virtual machine and click OK...

Review image

4. You will now see the full path to the folder you want to share and you can give it a name or just leave it as it is. Click OK to close the "Add Share" dialog...

Review image

5. You will now see the folder in the "Shared Folders" section. Click OK to close the settings dialog...

Review image

6. Now, start the Windows 7 virtual machine. When the system is fully loaded, open My Computer and click on the "Map network drive" button...

Review image

7. In the new window that appears, select a driver letter on the "Drive" field (any letter you want from the list), and... here is the big secret... type \\vboxsrv\ followed by the name of your shared folder, in the "Folder" field!

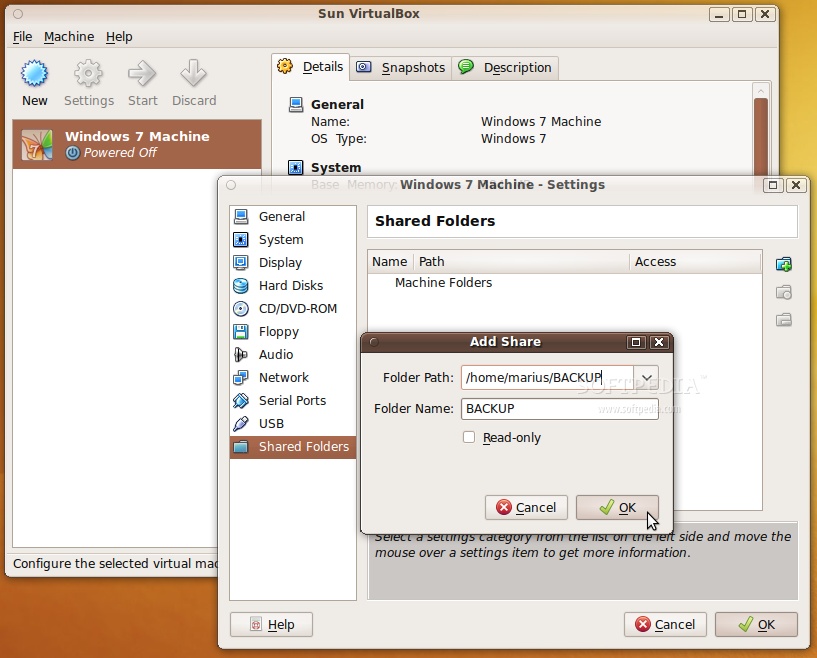
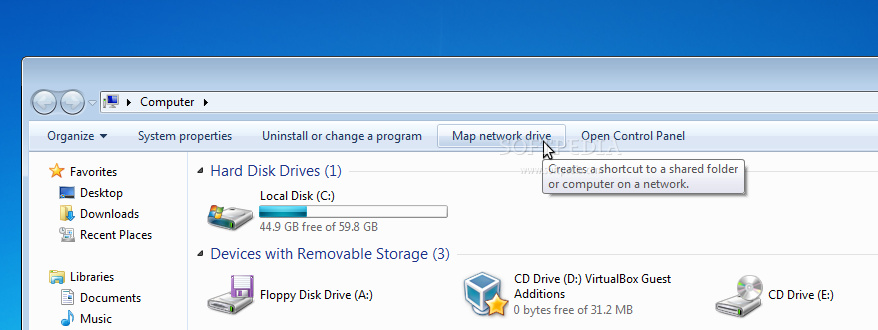
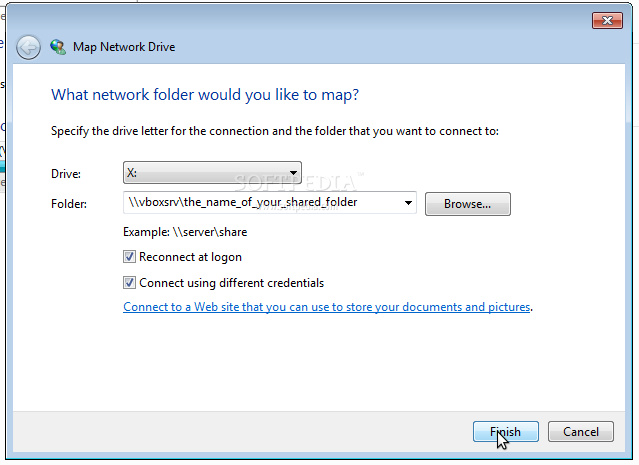
Also, don't forget to check the "Connect using different credentials" option either.

Review image

After this, click the "Finish" button and you will be prompted to insert the username and password of your Linux machine. Check the "Remember my credentials" option and click the OK button...

Review image

You can see your shared folder in the My Computer window, under the Network Location section... and it also shows how much space is left on the drive...

Review image

Simple, wasn't it?!


59,197 hits · 23 comments
Link to this article · Print article · Send to friend

MUST-READ RELATED ARTICLES:


How to Fix VirtualBox USB Support

VirtualBox 3.0.0 for Linux Brings 3D and OpenGL 2.0 Support

Mandriva Linux 2010.0 Beta Has Plymouth

Calculate Linux Desktop 9.9 Has KDE 4.3.1

Softpedia Linux Weekly, Issue 64

READER COMMENTS:


Comment #1 by: bubuzzz on 30 Sep 2009, 18:51 UTC reply to this comment

well, sorry... but this is still the old way to set the share folder. I did this way in my guest XP


Comment #2 by: falkTX on 01 Oct 2009, 08:45 UTC reply to this comment

What the heck??

Have you ever looked at the VBox GUI... in the shared folders... it ALREADY SAYS HOW TO DO THIS.

"net use X: \vboxsvrshared"
(where "X" is the drive to use and "shared" is the name of the shared folder)

The manual also talks about this...
And that's where people should look for help in the first place
The explanation/"fix" is already there!

Comment #2.1 by: Marius Nestor on 01 Oct 2009, 12:04 GMT

Those are just some commands and newbies have no idea what to do with them.


Comment #3 by: mc on 05 Oct 2009, 07:15 UTC reply to this comment

why would anyone need that on the pc?

If you really need to run some windows software in VM do you really need windoze 7?


Comment #4 by: Al on 14 Oct 2009, 00:23 UTC reply to this comment

Thanks for this. The manual is too difficult for some (me) to follow completely and that grumpy-ass Sasquatch just bitches at people with questions and occasionally gives an inadequate answer. They would do well to answer noobs questions with complete info and patience rather than pointing them back to FAQs and the manual, which most people with questions have already consulted. You made the abstract concrete here, thanks again.


Comment #5 by: Bruno on 04 Nov 2009, 20:34 UTC reply to this comment

You saved me! Thanks!


Comment #6 by: Larrxi on 18 Nov 2009, 14:48 UTC reply to this comment

Thanks! It is sad that you have to have Windows 7 installed to get Windows 7 on a usb stick to install from it.


Comment #7 by: Ryan on 19 Nov 2009, 02:13 UTC reply to this comment

Some people need to learn the golden rule. I too looked all over for this. Thanks for posting it!


Comment #8 by: Marco on 10 Dec 2009, 08:58 UTC reply to this comment

I also checked out the user manual, but it really sucks...it didnt make clear that it is a "must" to use that command "net use X: vboxsvrshared"
. In fact, it seems to suggest ppl can find the shared folder almost automatically but this is not the case. Thank you for your help!


Comment #9 by: Lester on 02 May 2010, 17:38 UTC reply to this comment

Thanks a lot, your instructions saved the day, easy to understand, much appreciated.


Comment #10 by: Nodir on 10 Sep 2010, 07:10 UTC reply to this comment

Hi, good illustration!
But, I have got this done only after having "Install Guest Additions" in VirtualBox (that's in the main menu when you run guest machine, under "Devices").

Thanks for post!
Nodir.

Comment #10.1 by: IK on 27 Jun 2011, 15:56 GMT

Good point BTW. For anyone who get trouble here (like me): Don't forget to install Guest Additions before.

Comment #10.2 by: trismegistos on 06 Feb 2012, 11:12 GMT

you need to indtall it for both the guest and host


Comment #11 by: lilian on 11 Sep 2010, 15:50 UTC reply to this comment

thanks a lot...!!!


Comment #12 by: ABaena on 31 Oct 2010, 07:25 UTC reply to this comment

Thanks!!!!


Comment #13 by: agoolly on 24 Jan 2011, 07:34 UTC reply to this comment

Thanks, helped a lot... was searching for an hour trying to figure out how to find my shared files


Comment #14 by: andyescribe on 01 Apr 2011, 20:35 UTC reply to this comment

kept getting authentication failure when mapping linux host shared folder so shared files using tried and true method, POUSBTD=plain old USB thumb drive

Comment #14.1 by: abi on 21 Jul 2011, 18:23 GMT

Thanks a lot..It helped me..was trying this for a long time

cheers


Comment #15 by: Chantry on 06 Oct 2011, 14:06 UTC reply to this comment

hi, i try to follow all step of the instructions. but why it does not work.
in step 7, i could not find the network of the shared folder. please help me....

Comment #15.1 by: hootie976 on 12 Jan 2012, 04:39 GMT

I too could not get this to work. I keep getting "Windows cannot access \\vboxsrv\apps"

I thought the problem was my network, so I have been fooling around switching it from NAT, to Bridged Adaptor, etc., but that doesn't seem to work.

When I supply credentials, I need to provide the ones for the host computer, not the guest computer, right?

I'm at a loss.


Comment #16 by: Jack on 02 Apr 2012, 07:49 UTC reply to this comment

"After this, click the "Finish" button and you will be prompted to insert the username and password of your Linux machine. "

I never get this dialog (even with the alternate credentials box ticked), and I think this may be why it always shows the folder as empty. Any help, please?


Comment #17 by: NG on 07 Dec 2012, 15:21 UTC reply to this comment

Thanks! it is very helpful


Comment #18 by: Preet on 06 May 2013, 06:11 UTC reply to this comment

Thanks a Lot

Copyright © 2001-2013 Softpedia. Contact/Tip us at

WindowsGamesDriversMacLinuxScriptsMobileHandheldNews

SUBMIT PROGRAM   |   ADVERTISE   |   GET HELP   |   SEND US FEEDBACK   |   RSS FEEDS   |   UPDATE YOUR SOFTWARE   |   ROMANIAN FORUM