14 DAY TRIAL //
 The command line, more properly known as a shell, allows you to navigate the file system and run programs. bash is an Unix shell written for the GNU Project. Its name is an acronym for Bourne-again shell because it's based on Bourne shell (sh), an early Unix shell released sometime around 1978 and that can still be found today on many Unix-like systems. However, the default shell for modern *nix distributions is bash. By customizing it, your work in the command line could become more productive and enjoyable and even make it less frightening for new users.
Bash customizing allows you to turn this (click to enlarge):
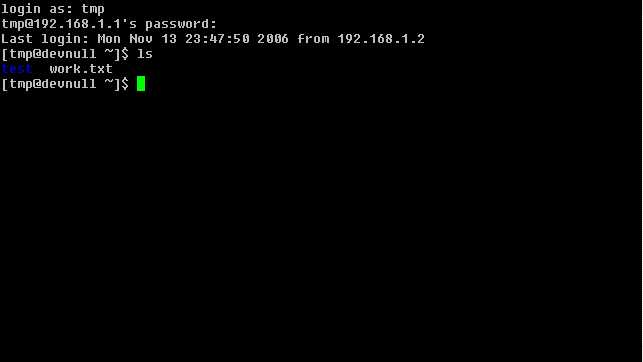
into this:
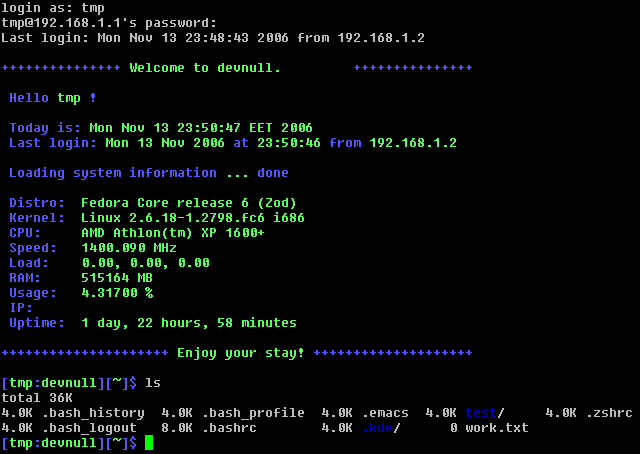
Of course, this 'customized' shell prompt is way too bloated and it will most likely be considered by many users as "lame" but I've written it only for test purposes. If you want to use it however, there's a download link at the end of this tutorial.
Besides the nice coloring, a customized shell prompt could display useful information such as dates, times, whether you have mail, the directory path you are in and a lot more. Also, if you have used Linux for a while, you know that there are a lot of commands available and some of them have very cryptic names and/or can be invoked with a truckload of options and arguments. The alias is a bash feature that allows you to rename these commands to something more simple and easy to remember. But first thing's first.
Appearence
The text for the prompt is held in the environment variable PS1 ("Prompt String 1"), and all you need to do to change the prompt is update the variable. Even if it's a little hard to believe, it offers a wide range of colors and control sequences to choose from. You can either end-up having a long shell prompt which shows the time, the user you are currently logged in with, hostname, the command number, current directory etc. or you can opt for a very small, yet distinct shell prompt which only shows the username and working directory. However, if you want to colorize it, you must first define the colors. This is done easily by editing the .bashrc (notice the ".") from your $HOME directory. For instance, if you are logged in with the username "dany" (just an example), you will find the .bashrc file in the /home/dany/.bashrc destination, while if you are using 'root', the file can be found at /root/.bashrc. To define the colors, open the .bashrc file in a text editor and add these lines:
# Colors
Black="$(tput setaf 0)" BlackBG="$(tput setab 0)" DarkGrey="$(tput bold ; tput setaf 0)" LightGrey="$(tput setaf 7)" LightGreyBG="$(tput setab 7)" White="$(tput bold ; tput setaf 7)" Red="$(tput setaf 1)" RedBG="$(tput setab 1)" LightRed="$(tput bold ; tput setaf 1)" Green="$(tput setaf 2)" GreenBG="$(tput setab 2)" LightGreen="$(tput bold ; tput setaf 2)" Brown="$(tput setaf 3)" BrownBG="$(tput setab 3)" Yellow="$(tput bold ; tput setaf 3)" Blue="$(tput setaf 4)" BlueBG="$(tput setab 4)" LightBlue="$(tput bold ; tput setaf 4)" Purple="$(tput setaf 5)" PurpleBG="$(tput setab 5)" Pink="$(tput bold ; tput setaf 5)" Cyan="$(tput setaf 6)" CyanBG="$(tput setab 6)" LightCyan="$(tput bold ; tput setaf 6)" NC="$(tput sgr0)" # No Color
The .bashrc file allows prompt string customization by using these backslash-escaped characters and color codes. Just like we used the -a flag to tell the list command what to do, you need to use the backslash to tell the bash prompt what to show. I've showed you the color codes, now it's time for the backslash-escaped characters:
[root@localhost root]#
If we translate this into backslash-escaped characters, the PS1 will look like this:
[23:08:46] [root@localhost usr]#
If you first want to test it however, you can type it directly into the shell prompt but it won't be remembered the next time you login. So, after you have reached the 'perfect' appearance, you should add the PS1= line to .bashrc so it will be used every time you open up a terminal.
You can add any of the backslash-escaped characters from the list above until you reach a lovely appearance.
Coloring
Coloring the shell prompt could be a little more difficult because the color codes should already be loaded. So in order to test the new shell appearance, you must edit the .bashrc file, save it and then type just like that: . .bashrc from the home directory so the file will load and the shell prompt will change its appearance.
For example, if you want to make the username show in light green and the current directory in blue, the PS1 variable will look like this:
- When adding colors to the shell's appearance, always include them into [$color] otherwise, it will look weird when typing very long commands. - If you have used colors in your shell's appearance, always end the PS1 variable with the NC (No Color) code, otherwise the commands you type will appear colored as well. So simply add the code [$NC] in the end of the PS1. - To test the new appearance, you don't have to close the session and open it again just to see how it looks. Just save the .bashrc file, go to your home directory (/root/ or /home/your-user/) and type: . .bashrc
Enough for the visual part. Next to the utility section.
Aliases
You might save some time and have a little fun by putting some aliases in your .bashrc file. The idea here is to personalize your environment and make it easier for you to be lazy. Aliases are one-liners, nicknames for commands that are too long or hard to remember to type every time. Aliases are added to the .bashrc file following the synthax:
alias nickname-command='some very -long [email protected]'
For instance, in order to connect to another Linux server through ssh, you would have to type the following command:
# ssh -v -p 29 [email protected]
What if you could configure your .bashrc file so you will only have to type home and the command above will be magically executed? That would be nice, wouldn't it? In order to make this happen, just add the following line to your .bashrc file (Of course, edit the username, hostname and port number to suit your needs):
alias home='ssh -v -p 29 [email protected]'
Next, apply the new settings to the current bash:
# cd $HOME # . .bashrc
Finally, type the command home and the ssh session should be automatically opened. Pretty neat, huh?
Another example: Get a summary of the disk usage in human readable format. You should type the command:
# du -h --max-depth=1 /directory
to find out the size of the subdirectories there. If you add the following line to .bashrc:
alias duh='du -h --max-depth=1'
and apply the settings (with . .bashrc), you will only have to type:
# duh /
to get the directories' size on your Linux system.
.bashrc file used for the second screenshot
It will probably be much easier for inexperienced users to get an already-done .bashrc and edit it rather than creating a new one from scratch. If you want to use the .bashrc file used to take the second screenshot, simply log in as the user you will like to change the shell appearance (could be simple user or root, doesn't matter) and type these commands:
# cd $HOME # mv .bashrc .bashrc.old # wget http://download2.softpedia.com:8081/linux/bashrc-file-tutorial # mv bashrc-file-tutorial .bashrc # . .bashrc
Besides the coloring, it has the following aliases:
ls - will list list all files (including hidden ones) from a directory and show their size (K, MB, GB etc) edit - will open nano with long lines wrapping disabled (-w) ps - will execute 'ps axu' pg - will help you find a program that is already running (will execute 'ps axu | grep -i' program-name)
You can easily add your own commands by following the pattern. Enjoy!