 14 DAY TRIAL //
 I've written this 'How-to' because many of the Linux users that migrate from Linux might encounter this problem more often than expected. It's crucial to have access to the data on your hard drive and, as you'll see later, it's possible to have instant access to the data on a file sharing server.
Honestly, I don't know any filesystem not supported by Linux, but I can tell you that I don't know many of the supported ones. The supported filesystems on a Windows machine can be counted on the fingers of one hand.
To use a partition from you hard drive in Linux, it has to be mounted. Mounting a partition means actually attaching the filesystem to a directory on your Linux OS. This is done using the mount command, but if you want it to happen automatically when the system starts, you should edit a special file called fstab that holds all the static information about filesystems.
All the descriptive information about various filesystems is used by the mount -a command at boot time. Each filesystem is described on a separate line, and fields on each line can be separated by tabs or by spaces.
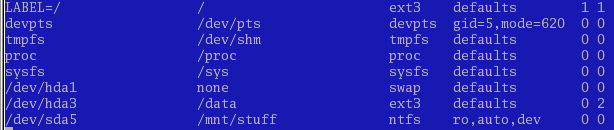
Almost forgot to tell you some crucial information: fstab can be found in the /etc directory. I will open it in the Midnight Commander Editor using the command "mcedit /etc/fstab", but you can use any editor you'd like. If you use an editor in the graphical interface, maximize it because, if you don't see each entry on a line, you might get confused.
As you can see, some entries are already there. Those are very important and you shouldn't modify them if you still want to have a working system.
Let's assume the following scenario. You have a FAT32 partition and a NTFS partition. You want to be able to use them in Linux and your Linux distro doesn't add them automatically or perhaps is a storage device that wasn't in the computer when the installer created fstab.
In the first field from the new line that will be added, you start with the block device that should be mounted.
Block Devices - the naming convention in Linux. Block devices are located in the /dev directory and, for ATA drives, they are called hd. x is usually a or b, but can also be c, d and perhaps even more. It is a if the drive is primary, b if it's secondary and, if your motherboard supports many ATA devices, it goes on. y represents the number of the partition. If it's the first partition on the hard drive, the number will be 0, if it's the second, it will be 1 and so on. Assuming your drive is secondary and the partition is the third on the drive, the block device will be hdb2. In case of SATA, SCSI or USB drives, instead of hd we'll have sd.
A cool thing about this first field is that you can also mount Network File Systems. Instead of specifying /dev/hdb2, you can specify a host of a directory for the share like ws30:/datadir, where ws30 is the hostname and /datadir is the shared directory you want to mount. Even though this might not seam much, it can prove itself to be very useful in some situations.
The second field is where you choose your desired mount point. The mount point is the folder that you want to use for accessing your files from that partition. This folder should exist and should be empty. Otherwise, it can't be used as a mount point. Generally, mount points should be created inside the /mnt folder, but you can create one anywhere. One of my mount points is /data for an ext3 partition that I use to store music, books and some junk files I never delete.
In case you have a swap partition, you should specify none here. I've noticed that some Linux distros have swap instead of none in this field, but, theoretically, this is not correct. Anyways, this line is not mounted by a mount -a command, but by the swapon command.
The third field specifies the file system type. As I've said before, many are supported, but for our example we should use vfat in case of FAT32 and ntfs in case of the NTFS partition. There is nothing special about this field I can tell you about. Things are pretty straight forward here.
The fourth field describes mount options, and, here, things can get pretty complicated. Because I'm a lazy person and I don't want to consume myself very much with simple tasks that should be done easily most of the time, I just slide a "defaults" options in this field. This is definitely not the right thing to do, but it works almost every time. If I remember correctly, the "defaults" option mounts the file system as read-write, allows it to be mounted automatically at boot time, permits the execution of binaries and forbids users to mount partitions manually. I think there are other things associated with the "defaults" option, but I don't remember them now. Sometimes the "noauto" parameter should be used if you want to mount a file system explicitly, and don't want to get it mounted at boot time.
However, you should use parameters that suit your needs, and if you want to read more about those, go to the mount man. Most probably you'll get bored quickly, but there's a great deal of information there that might come in handy. When adding more than one parameter here, remember to separate them with a comma, not with a space.
The fifth field is used to determine if a file system needs to be dumped. Supported values here are 0 and 1. 0 means no dumping and 1 dumps the file system. Honestly, I don't know for sure when this should be used, but I suspect that 1 is necessary in case of ext2 and ext3 partitions. For vfat, ntfs and others, 0 works just fine.
The sixth field is the last field from a fstab line and is used to tell fsck (I think it stands for filesystem check) if a filesystem needs to be checked and what's the order in which the checks are done at reboot time. Available options here are 0, 1 and 2. 0 is for no checking, 1 is for the root filesystem and this appears only on the first line of fstab, and 2 tells fsck to check the filesytem. If you let this field blank, fstab assumes 0 as a value for this field.
After finishing editing the fstab, you should leave a blank line if you don't want to get an annoying useless error that there is no final newline at the end of fstab.
The fstab file is pretty intuitive and might not seem much at first. I decided to write this 'How-to' because fstab is very important and has many things that most of the people don't know about. Hopefully, this tutorial got you where you wanted and maybe a little further and, hopefully, you'll have a correctly edited fstab in your desktop computer.