 14 DAY TRIAL //
 FreeNX is a VNC-like remote desktop protocol, based on the proprietary NX remote access solution designed by NoMachine. Unlike a normal VNC protocol, FreeNX compresses at the X protocol level, offering a much better experience over low bandwidth connections. To get an idea of how powerful FreeNX really is, imagine you'd have to use a normal VNC client over a dial-up connection. You would barely be able to do anything on the remote PC, a simple click would show the effect in a few seconds and image quality would be very poor. On the same dial-up connection, the FreeNX protocol however, will offer instant effect for your mouse or keyboard actions and moreover, the output images would be similar to those you see when you're actually in front of the remote PC. Not to mention that when using the FreeNX protocol over high bandwidth connections, you would barely notice you're not actually at the PC you're remotely controlling. And that's not all! NoMachine (the creator of NX protocol) has free clients for most operating systems, enabling you to control your home (or work or wherever) Linux PC from any PC, whether it's running Linux, Windows, Mac OSX or even Solaris operating system.
Installing
NOTE: SSH Daemon (sshd) must be installed and running.
On the computer you want to manage remotely (server):
- Installing the FreeNX server on Fedora Core 5/6 only requires running the command:
On the computer you'll connect from (client):
- Go to NoMachine Download Page and download the proper client, based on your client PC operating system. On the same page, you'll find instructions on how to install the NX client on each operating system.
Configuring the NX Client
NOTE: You'll need to get the /etc/nxserver/client.id_dsa.key file from the remote computer and save it somewhere on the client computer, the one you'll configure NX Client on.
- Once the NX Client has been installed, you'll have to configure it before you can connect to the remote computer. The first time you'll run the NX Client, a configuration wizard will appear. Follow these steps to configure your client:
- First, you'll see the welcome screen. Skip it by pressing Next.
- In the next screen, enter a session name (doesn't matter, it's up to you) in the Session field, enter the computer's IP you want to connect TO in the Host field. In the Port field, enter the port number used by the remote PC to run its SSH daemon on. Finally, select the type of your internet connection and click Next. - In the next screen, select Unix in the first drop-down menu and then select your preferred window manager from the second drop-down menu. Next, select the size of the window you'll see the remote desktop in and finally, check the Enable SSL encryption box. Click Next.
- This is the final screen. It's up to you if you want the wizard to create a shortcut on your desktop or not but make sure the "Show the Advanced Configuration dialog" box is checked and click Finish.
- This will open the advanced configuration dialog where you'll have to click on the Key.. button. From the Key Management window, click the Import button and browse for the client.id_dsa.key file you've downloaded earlier from the remote computer. Click Save in the key management window, click Save again in the NX client configuration dialog and finally click OK.
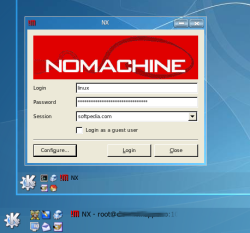
- You'll now have a small window requiring login, password and session. Enter the Unix username you'll use to connect to the remote computer and the password. This username must be configured on the remote PC. Finally, click on Login and if everything worked fine, you should see the remote Desktop in a few seconds. Enjoy!