
 14 DAY TRIAL //
 What is DNS? Domain Name System (DNS) is like a phone book, but for Internet. DNS translates human-readable computer hostnames, e.g. www.softpedia.com, into an IP address needed by the networking equipment to deliver information. In other words, when you open your browser and type an URL in the address bar , e.g. www.softpedia.com, the DNS server translates that URL into a numeric IP address, from www.softpedia.com to 193.226.140.131. To understand better, type the IP address from the previous example into your browser's address bar and you will see that it will be transformed into www.softpedia.com.
Now, if you have a DSL, ADSL, Dial-up or FIOS (fiber-optic service) Internet connection, you must understand that your computer uses the default DNS server(s) from your Internet Service Provider (ISP) and if this DNS server is slow in resolving URLs, you (the victim) will see that almost all the web pages that you try to access, are loading slow. So, practically it doesn't matter how fast your Internet pipe is. For example, you can be the proud owner of a 1 Gbps bandwith, but if the DNS servers from your ISP are slow, your web surfing will be slow too.
What can you do to fix this? You can call or go to your ISP and complain about this problem, until you get tired probably, or you can continue reading this guide in order to improve your web surfing sessions.
Use OpenDNS - Make your Internet better
Probably you have figured it out already that you must change your DNS servers, in order to speed up your web surfing. And to achieve this, you will have to use the OpenDNS service, which is the #1 DNS service provider around the world. OpenDNS is FREE and requires nothing to download. Moreover, it will not replace your existing Internet connection, it will just make it better. Also, OpenDNS offers some other free services, like the possibility to have your personal web shortcuts. For more information about OpenDNS please visit the official home page.
Here is what you must do. Please back up your DNS addresses before replacing them with the ones from OpenDNS, in case you want to return to them later for any reason. The DNS server addresses for OpenDNS are:
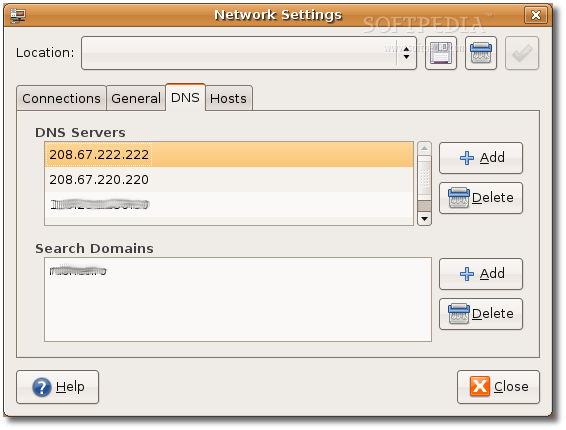
208.67.222.222 208.67.220.220
For Static IP address
If you have a static IP address that you must manually configure in order to have Internet access, please use the following method.
Open a console and type:
nameserver 208.67.222.222 nameserver 208.67.220.220
For Dynamic IP address (DHCP)
If you use a dynamic IP address (DHCP), that means you get your Internet IP address, subnet mask, DNS and gateway automatically from your ISP's DHCP server, please follow the instructions below:
Open a console and type:
#prepend domain-name-servers 127.0.0.1;
with this one:
prepend domain-name-servers 208.67.222.222, 208.67.220.220;
Restart your network for the changes to take effect:
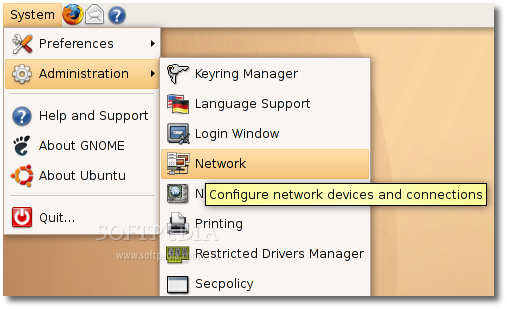
If you use Ubuntu, please go to System -> Administration -> Networking, click on the third tab (DNS) and add, one by one, the OpenDNS addresses on top of the first field (DNS Servers). Close the window and restart your computer.
What now? Visit http://welcome.opendns.com/ to test your new settings. If you see a web page that says: Welcome to OpenDNS! Your Internet is safer, faster, and smarter because you're using OpenDNS. Thank you!, then you're back in business! Enjoy your lightning-fast Internet connection!
Broadband ONLY Hacks
For broadband user ONLY, please add the following lines (copy/paste) in your /etc/sysctl.conf file. Open a console and type:
# Tweaks for faster broadband... net.core.rmem_default = 524288 net.core.rmem_max = 524288 net.core.wmem_default = 524288 net.core.wmem_max = 524288 net.ipv4.tcp_wmem = 4096 87380 524288 net.ipv4.tcp_rmem = 4096 87380 524288 net.ipv4.tcp_mem = 524288 524288 524288 net.ipv4.tcp_rfc1337 = 1 net.ipv4.ip_no_pmtu_disc = 0 net.ipv4.tcp_sack = 1 net.ipv4.tcp_fack = 1 net.ipv4.tcp_window_scaling = 1 net.ipv4.tcp_timestamps = 1 net.ipv4.tcp_ecn = 0 net.ipv4.route.flush = 1
Then type the following code in the console, in order to activate the settings immediately: