USB sticks have come to be an essential part when working on a computer. And this small device has all the advantages to its side: it comes in different shapes and storage sizes, due to its physical size it can easily be attached to a key chain, it can carry around your important data, works with every computer with an USB port and can be configured to your own needs. Even its price is in free-fall and anyone with less than $50 can purchase one.
But let's get back to the configuration part. With a few commands wisely placed in the right location and a few files at its root you can customize it to fit your personality and preserve them on every machine you stick it in.
Auto-running specific actions, labeling and naming your regular USB stick (as opposed to U3 USB) is a good way to start. So, first of all, create an autorun file with Notepad and change the extension from TXT to INF. The reason for this action is that, once you have plugged the USB into a computer, Windows will look for it and execute the commands included by default. If you want to disable this, read this.
Now that we're done with the easy part, let's get to the hard work. It's so hard that it'll only take a couple of minutes to finish plus adding the necessary files to the portable drive.
The first step to be taken is telling Windows what should it do the moment the USB stick is detected and, for this, we use [autorun] (typed with Brackets) command as a header of the autorun.inf file. All that follows has to be neatly arranged one command per line, otherwise the tricks won't work.
Labeling the USB drive is an easy trick and, although you can do this by simply pressing F2 in Windows Explorer while the USB drive is selected, it will not allow you full flexibility as the number of characters are limited to 11. Using label command you can name your USB key whatever you want and use more than eleven characters. To do this simply type in "label=Whatever name you want".
Going deeper into the personalization process you can set an icon to be shown in Windows Explorer as a distinctive sign of the key owner's personality. For this, there is a slightly more complicated action as you also have to place the desired ICO file at the root of the drive. Once this is done edit autorun.inf by adding the icon command which equals to the image at the root of the drive (icon=Softpedia.ico).
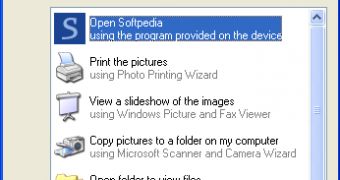
And now we get to the really fun part of the customization: AutoPlay menu. First you should know that the two options used for the customization are "open" and "action". The first one will automatically launch the file it is indicated, while using the second will result into populating AutoPlay menu with the message the user is prompted with.
With "open" you point to the application to be launched from AutoPlay menu and this should be available at the root of the drive. All you need is to append open=Softpedia.exe command in the Autorun file and make sure you have a Softpedia.exe file at the root of the drive.
"action" is used just for adding a message so that you know what is going to happen when open command is accessed via Windows AutoPlay menu. If everything is done right it should look like the image at the beginning of the article.
Don't limit yourself only to this simple customization as there is more to be done like adding context menus specific to the USB drive (the same [autorun] file needs to be edited), menus that have all sorts of actions behind.

 14 DAY TRIAL //