14 DAY TRIAL //
 PWN to OWN. This is the name of the contest that made most Mac users worldwide seriously think about reading a security book or two to learn about securing their Macs ASAP. During the aforementioned contest a Mac running OS X Leopard was the first to give in to the intrusion attempts. It may not have been the brightest day in Apple's history but it surely was the one when every Mac owner out there gave a second thought to the "Macs are the most secure" theory.
So, if Macs aren't as secure as we have previously thought (I did too and even bet on the Vista computer that it would be the first to be compromised), what can we do to defend ourselves against attacks? One way would be to fire up the old integrated Mac OS X firewall and configure it to accept only incoming connections from IP addresses we know.
Although this is a good thing to do, the integrated firewall doesn't do as good of a job as Apple would want us to believe. If you are not a very experienced user you'll probably end up just enabling the damn thing and what protection do you think you'll get? I'll tell you: not very much because the machine that got "owned" at the PWN to OWN contest had the default settings and it went down pretty fast.
I know, this really is kind of hilarious, but hey, what else can you do? See, Apple really thinks about everything. It even allows you to stay online giving you a fake sense of security, kind of like walking through a black alley with a gun in your pocket (a gun filled with blanks).
So, this time for real, what can you actually do to protect the data on your Mac? To your surprise, and mine, the answer is given by the guys at Apple. Don't know if you still remember but a while ago the company released a security configuration document for Leopard in which you can find a huge array of security tips that can help you protect your Mac more efficiently.
I have read the whole 240 pages and picked out the most important 5 tips - in my opinion - that you can use to be sure no one will ever be able to get access to your private data, or at least make their life a living hell while trying to breach into your system.
Tip 1 - Secure the network sharing services
The first and easiest way that comes to mind when dealing with securing your data is to prevent access to it from the outside. The easy way to do that would be to secure its network sharing services. How can this be done? Easy as pie: simply turn off the sharing services that you consider unnecessary and only leave running the ones that you really need.
Under this paragraph you will find the command-line commands you will have to enter to stop the following sharing services: DVD or CD sharing, screen sharing aka VNC, file sharing (trough FTP, SMB and AFP), web sharing (HTTP), remote login (SSH), remote management (ARD), Xgrid sharing, Internet sharing and Bluetooth sharing. Quite a handful if you ask me and as many opportunities for strangers to get their hands on your data.
The following commands are all available in the Leopard security configuration document published by Apple at the beginning of June 2008. To be able to use them you have to open a Terminal window, write each of them in the command-line and hit ENTER to run them. If possible use a copy/paste technique to be sure you don't miss any characters because you will be the only one responsible in case you break your system.
service com.apple.ODSAgent stop
## Disable Screen Sharing.
sudo rm /Library/Preferences/com.apple.ScreenSharing.launchd
## Disable FTP.
launchctl unload -w /System/Library/LaunchDaemons/ftp.plist
## Disable SMB.
defaults delete /Library/Preferences/SystemConfiguration/
com.apple.smb.server EnabledServices
launchctl unload -w /System/Library/LaunchDaemons/nmbd.plist
launchctl unload -w /System/Library/LaunchDaemons/smbd.plist
## Disable AFP.
launchctl unload -w /System/Library/LaunchDaemons/
com.apple.AppleFileServer.plist
## Disable Web Sharing service.
launchctl unload -w /System/Library/LaunchDaemons/org.apache.httpd.plist
## Disable Remote Login.
service ssh stop
## Disable Remote Management.
/System/Library/CoreServices/RemoteManagement/ARDAgent.app/Contents/
Resources/kickstart -deactivate -stop
## Disable Remote Apple Events.
launchctl unload -w /System/Library/LaunchDaemons/eppc.plist
## Disable Xgrid Sharing.
xgridctl controller stop
xgridctl agent stop
## Disable Internet Sharing.
defaults write /Library/Preferences/SystemConfiguration/com.apple.nat NAT -
dict Enabled -int 0
launchctl unload -w /System/Library/LaunchDaemons/
com.apple.InternetSharing.plist
## Disable Bluetooth Sharing.
defaults -currentHost write com.apple.bluetooth PrefKeyServicesEnabled 0
Tip 2 - Secure local access to your system
Once you have stopped the unnecessary sharing services it is time to secure local access to your system. The easiest way to do this is by managing the users that can get administrative privileges on your system. In the UNIX world, obtaining such privileges means that you are able to use the sudo command that will allow you to run any command you want as the one and only superuser aka root.
Why is it important to restrict access to this command? Because if an intruder gains access to your Mac and manages to get his/her hands on the root account (its hands if it's some kind of super hacking robot) then he/she can do anything he/she wants on your system besides removing pieces of hardware out of the case (although they can be disabled if the intruder has the necessary skills).
To restrict access to the sudo command on certain accounts and only allow the trusted users to be able to run commands as superuser you will have to edit the /etc/sudoers file using the "sudo visudo" command (without the quotes). Next, remove the line that begins with �min and, for each user that you want to be able to get superuser privileges, add "user ALL=(ALL) ALL" (where user is the user's shortname). Now what remains to be done is to save and quit.
After editing the /etc/sudoers file this way you will have to repeat the same steps if you add other users to the system and want them to be able to use sudo.
Tip 3 - Encrypt your home folder
Now that you have secured the network and local access to your system and data, the time has come to further reinforce protection by encrypting your home folder. The easiest way to accomplish such a task is to use FileVault, an integrated OS X application that will help you encrypt a user's home folder and files.
FileVault acts by moving everything you have in your home folder to a bundle disk image that can be encrypted using AES-256 encryption. The only downside to using it is that it will only act locally and will not protect and/or encrypt any data that you decide to move to a removable device or over the network.
Despite the fact that FileVault is not able to protect data outside your home folder, you can still have a bit of security enabled for the data that you temporarily store outside your home directory. When deleting such data you can make sure no one will ever get access to it by securely deleting it. Which brings us to the next tip.
Tip 4 - Securely erase data from your hard drive
I've mentioned above that you can securely erase data from your hard drive, which means that an ordinary deletion will not do the trick if you do not want later attempts of retrieving your data from your hard disk to be successful. When you delete something from the drive the system will not actually send it to oblivion. The only thing it actually does is remove the information related to that certain piece of data from the file system. In other words, it just causes itself a bad case of amnesia.
Albeit this will render all your attempts to recover the files using less advanced methods unsuccessful, there still are ways to retrieve it if you have the necessary software. Such a solution is called recovery software and it will be successful in its task if the hard disk space your data has been on has not been overwritten.
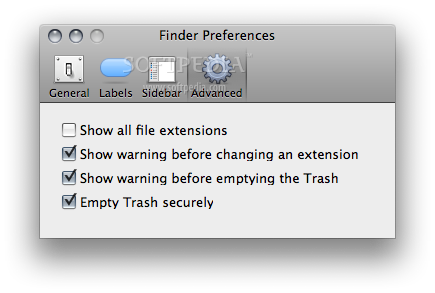
To make sure you will always securely erase your data from Finder go to Finder's Preferences, click on the Advanced tab and there check the "Empty Trash securely" entry.
There are of course other ways to securely delete data on your Mac using the Disk Utility, the srm command-line command, securely emptying the Trash using Finder's "Secure Empty Trash" option. To get a more detailed overview on how you can use them just download Apple's document from HERE and head over to the "Securely Erasing Data" sub-chapter.
Tip 5 - Intrusion detection system
What do you call a secure system without an intrusion detection system? Well you can call it anything you want but one thing is certain: there is no system out there that can be considered 100% secure (except maybe the ones with no Internet connection but even those can be stolen).
In case of an intrusion you definitely want to know everything possible related to it. As Apple says, an intrusion detection system is the answer to this problem, because it will allow you to easily monitor everything that happens on your Mac and to examine the data that gets transferred through the network interfaces.
The exact same system will be the one that will automatically alert you in case of suspicious activity and, most of the time, it will also prevent malevolent actions before they are even performed.
The intrusion systems that you can use are of two kinds: network based and host based. From the first category I recommend you to install and use the free HenWen security application for OS X that will allow you to run and configure Snort, which will scan the network for undesirable traffic. The second category's performer in my opinion is the also free Radmind Assistant, a solution that acts as a tripwire, being able to quickly detect and reverse changes to file system objects like folders, files, links, etc.
These are the tips that will help you protect your data more efficiently. If you have other related tips of your own, share them with us in the comments.