MakerBot wants as many people to buy and enjoy its Digitizer 3D scanner, but as with everything else related to 3D printing, scanning isn't as easy as just pressing a button. There are some things to take into account before scanning something, and preparation can make a huge difference in the end result.
The company has been creating a series of helpful posts to get people started. The first covered setting up the scanner, while the second focused on external things, like lighting and positioning.
In the third post, the focus is on the object being scanned. As you may have expected, some objects fare better than others in the scanning process.
As a general rule, the simpler the object, the better the resulting 3D model, and this doesn't just apply to the geometry. Matte and opaque objects will be much easier to scan and will result in a much more accurate model than shiny or transparent ones.
Single-color objects are also better, but multiple-color ones are ok as long as you set the scanner to the darkest color in the object.
If an object meets all these criteria, it's going to be easy to scan, just pop it on the turntable and set the Digitizer loose.
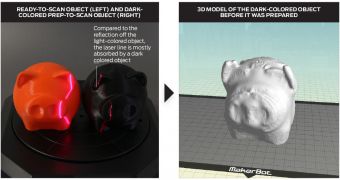
But some objects will require some preparation. For example, dark objects can be scattered with a white powder, so that the lasers are better reflected and captured by the sensors. Same goes for transparent objects which would simply let the laser light pass through otherwise.
Of course, if you don't want to ruin your original object, you may wish to use something that can easily be washed away. Makerbot suggests cornstarch, flour, talc, or dry shampoo. Developer's spray also works, as does tempera paint.
Even with all these tips, it's fair to say that you'll get the best results simply by experimenting with different settings and setups.

 14 DAY TRIAL //